Final Fantasy VII Rebirth Protorelic Guide: Get all the Phenomenon Intel and earn the Gilgamesh Summon Materia
The Protorelics of Final Fantasy VII Rebirth are mysterious artifacts found in each of the game's playable regions. Acquiring them via Chadley's Phenomenon Intel activities makes up one of the longest and most involved quest chains in the game, spanning the entire game world and a widely varied set of activities. These activities aren't the easiest or simplest ones to master, so we've come up with a guide to every Protorelic quest in the game, read on to find spoiler-free solutions to every quest and tips for beating some of the challenges they surface.
Click on each link to move to each Region's Protorelic quests.
- What you need to know about Protorelics and Phenomenon Intel
- Grasslands Protorelic Phenomenon Intel
- Junon Protorelic Phenomenon Intel
- Corel Protorelic Phenomenon Intel
- Gongaga Protorelic Phenomenon Intel
- Cosmo Canyon Protorelic Phenomenon Intel
- Nibel Protorelic Phenomenon Intel
- Meridian Ocean Protorelic Phenomenon Intel
What You Need to Know About Protorelics and Phenomenon Intel
Protorelics are strange artifacts found in Final Fantasy VII Rebirth's world that don't quite seem to belong there. Their exact purpose and power are unknown for most of the game, but the quests to get them stretch over almost its entire runtime. You'll receive your first Protorelic quest while questing through the Grasslands, the first region of FF7 Rebirth's open world. Each Protorelic quest takes place over four Phenomenon Intel nodes on the regional map.
Every region has its own set of four Protorelic quests, and each region has a unique mechanic or minigame tied to its completion.
Completing all of the Phenomenon Intel nodes in each of the six main playable regions will unlock a final, seventh Protorelic quest chain.
Your ultimate rewards for completing the Protorelic quest chains are:
- The Gilgamesh Summon Materia
- Item Transmuter Blueprints for three Genji Accessories:
- Genji Gloves - Breaks the 9,999 maximum damage cap.
- Genji Earrings - Increases damage dealt by 15%, increases damage received by 15%.
- Genji Ring - Reduces damage received by 15%, reduces damage dealt by 15%.
- Brutal and Legendary Combat Simulator Challenges
- Unlocks Materia for purchase from Chadley:
- Swiftcast Materia - Reduces cast time of linked materia's spells by 50%-100% (based on Materia level).
- Reraise Materia - Applies Reraise status, which automatically revives allies when they fall in battle.
- Spare Change Materia - Unlocks Spare Change ability, which throws between 1,000 and 10,000 gil to do damage. The more gil thrown, the more damage dealt.
- Limit Support Materia - Equipping ally no longer gains limit gauge, but transfers all limit gauge increases to their allies.
Grasslands Protorelic Phenomenon Intel
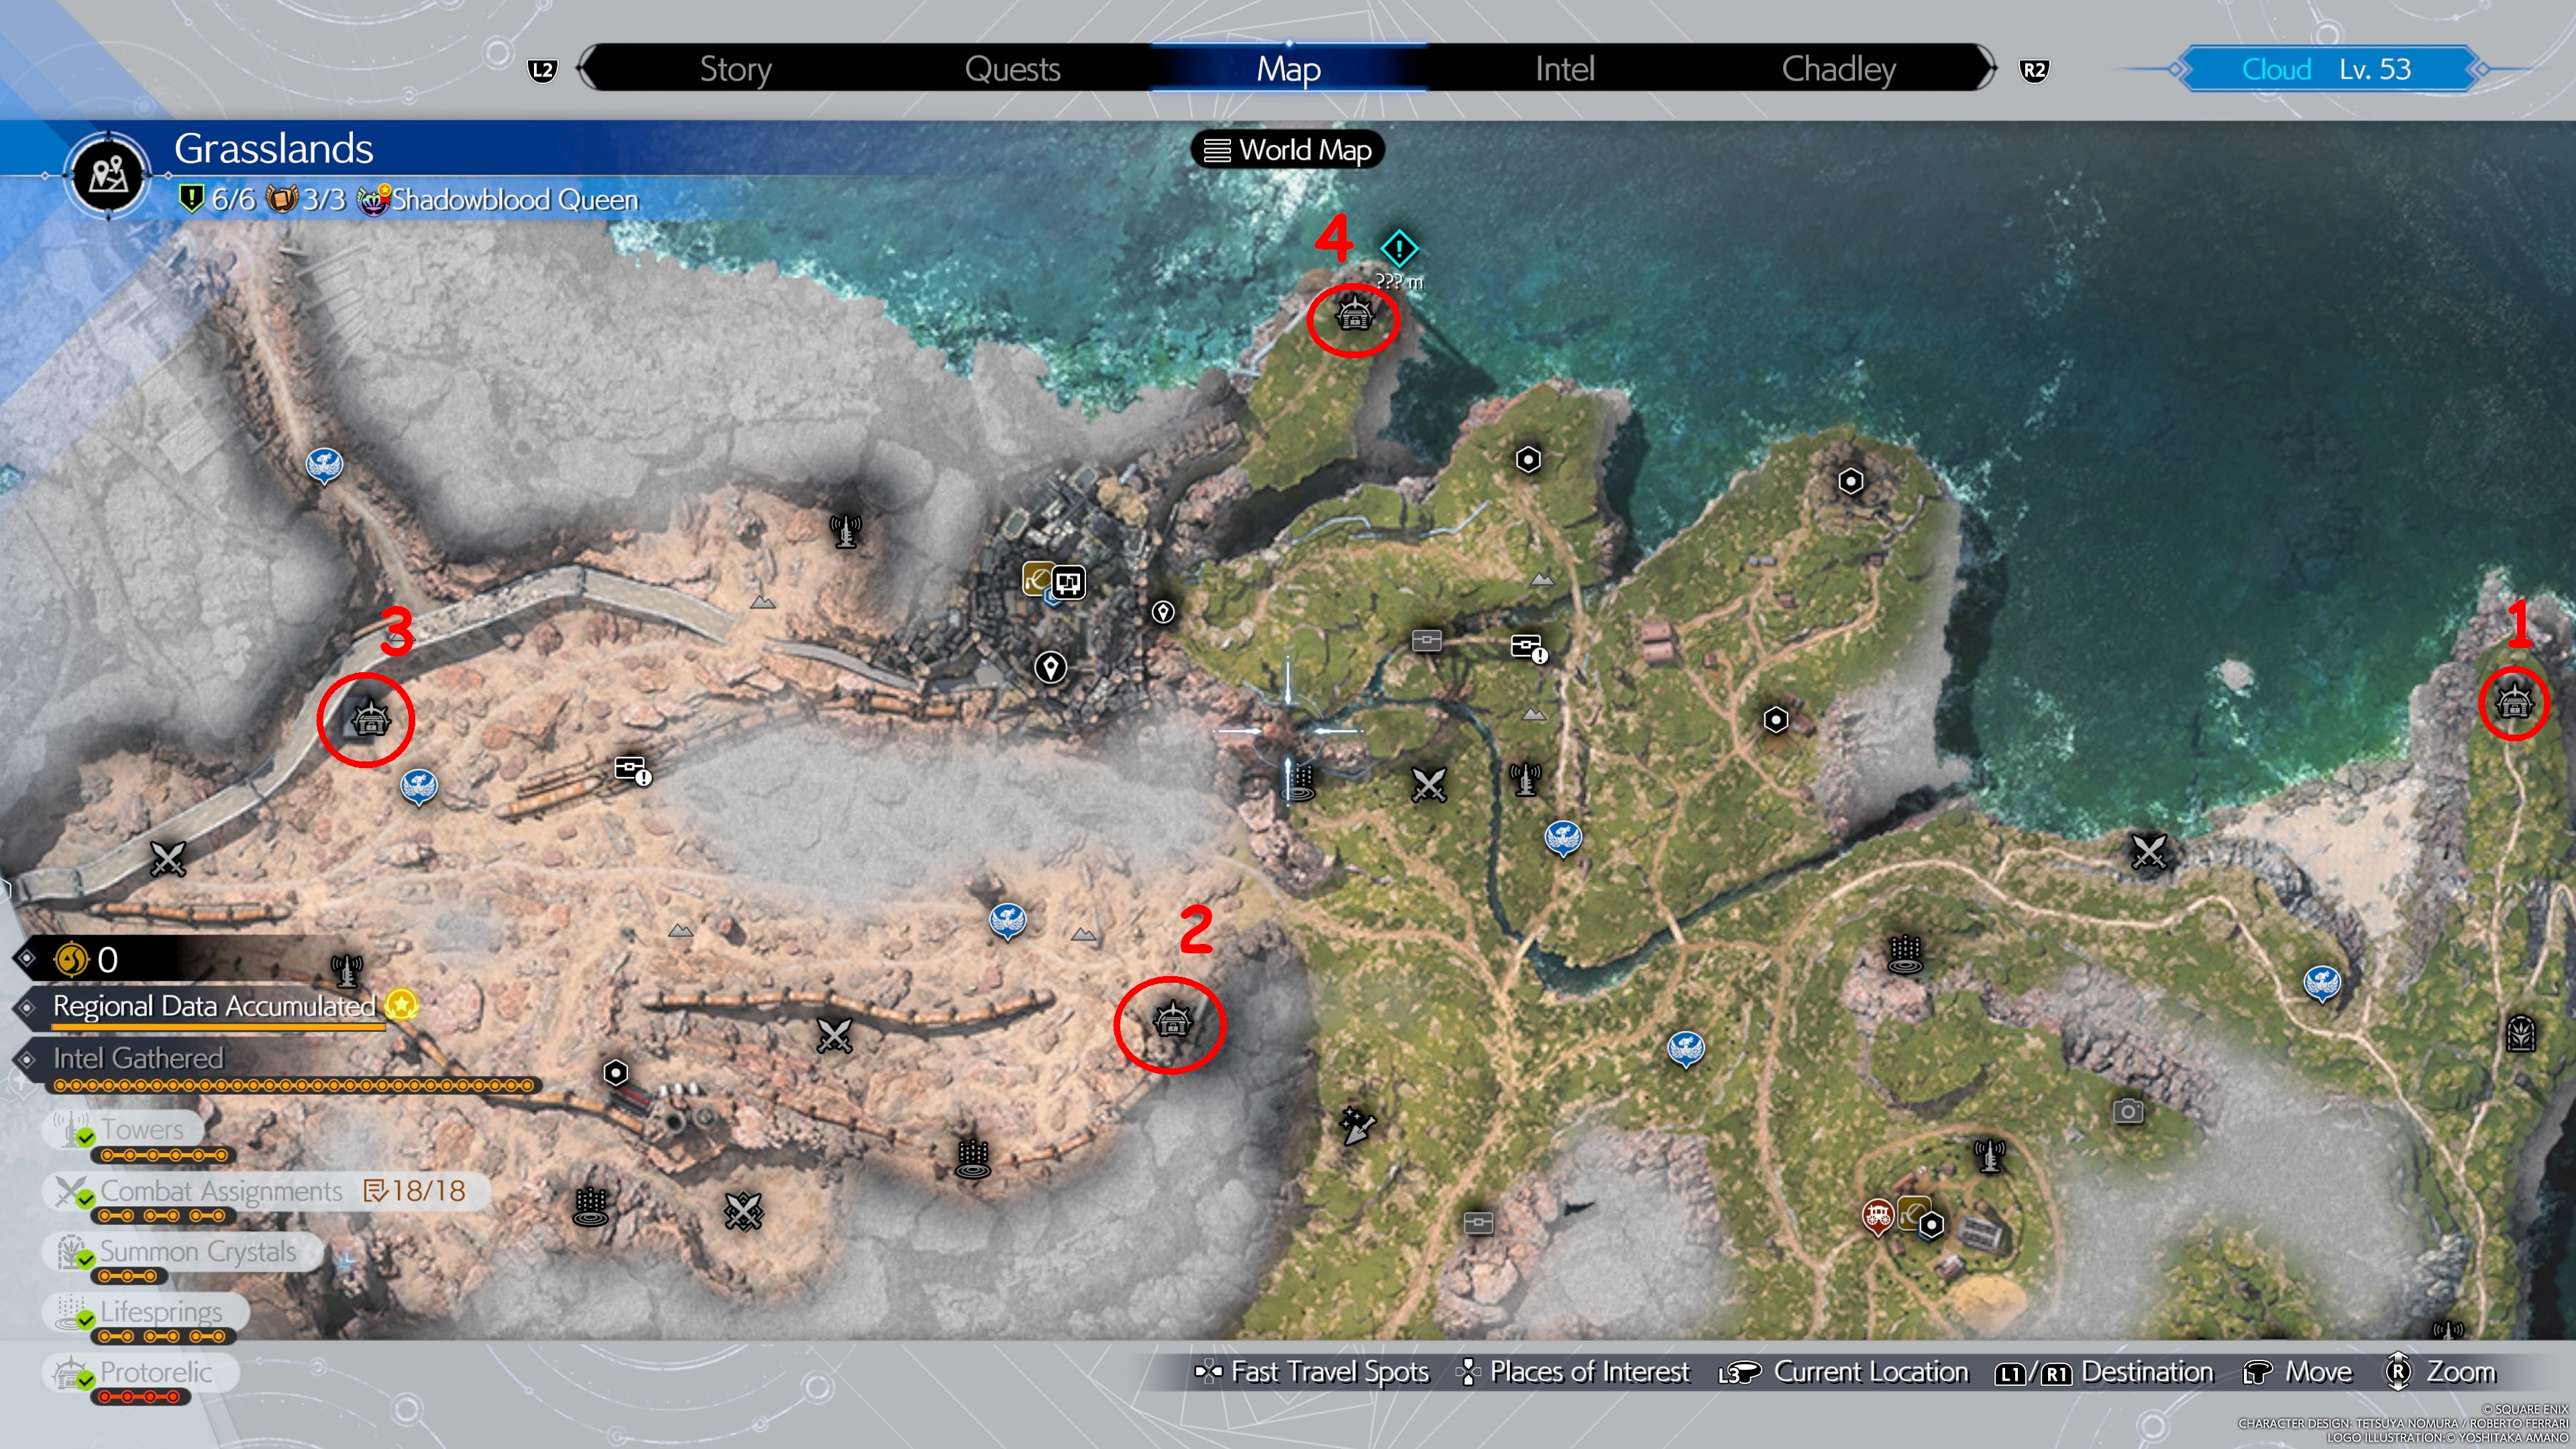
The Grasslands Protorelic quests all take the form of encounters with Beck and his band of bandits, and are the most straightforward of the Protorelic quests.
Phenomenon Intel 1: Wild Bandit Chase
You'll be introduced to this quest by Chadley and directed to a tower in the northeast corner of the Grasslands regional map. There you'll need to climb a short tower, accessible through a hole in the fence, and meet Beck and his goons. Defeat them, and they'll scuttle away, unlocking the next quest node.
Phenomenon Intel 2: One Badass Barbecue
The next location is in the dry western area of the grasslands, in a dilapidated set of buildings. You'l need to sneak past the goons by using the shipping containers for cover, then climb to the roof and ambush the baddies from above. Once again, they'll skitter away to the third node.
Phenomenon Intel 3: Diversionary Tactics
The third node starts with a quick choice: You'll need to pick which of Becks' bandits is holding the Protorelic piece. The choice doesn't really matter, but it's Burke, on the left. After the fight, you'll need to dig up the key by using your chocobo to sniff out its location, just like an Excavation Intel node.
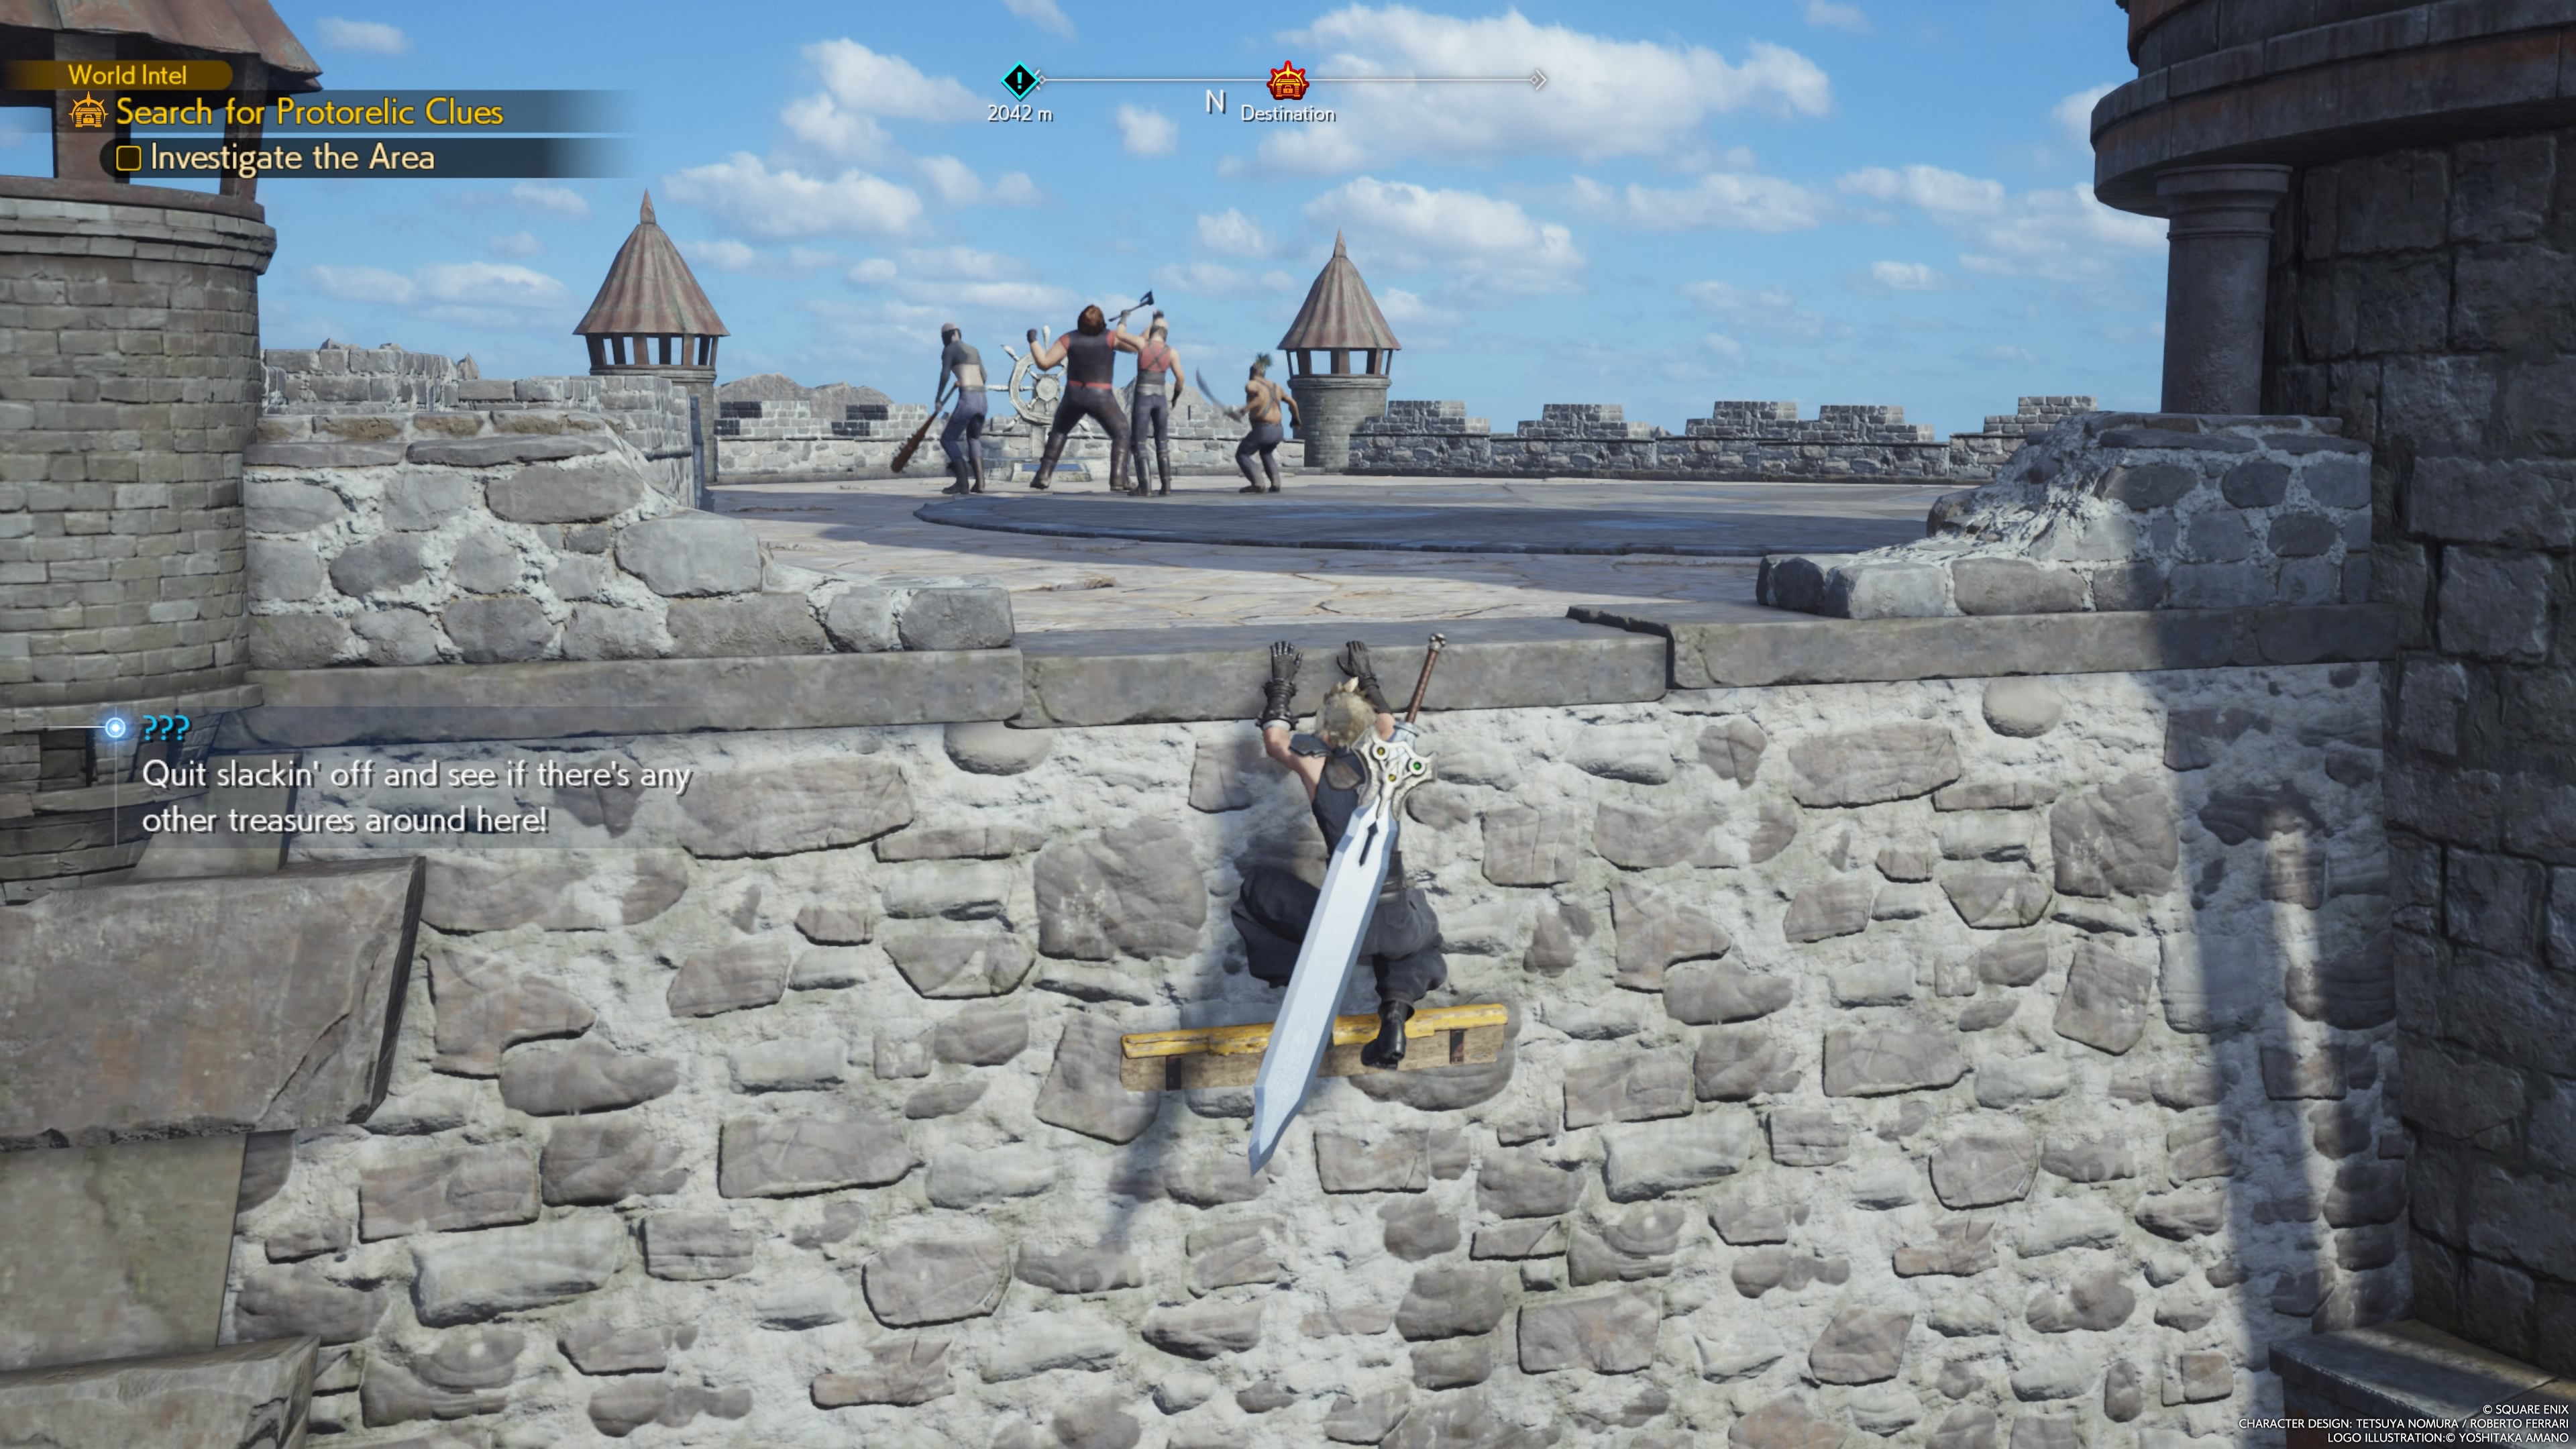
Phenomenon Intel 4: Taking Care of Business
This final Protorelic node is accessible only via a previously locked door right near the Kalm Air Raid Shelter waypoint, where Cloud and the party first emerged into the open world.
You'll arrive at the bandits' lair only to find them already lying in defeat...or are they?
Activate a lever to the right of the entrance to cause a wooden box to fall and "wake up" Beck and the crew. You'll have a choice to pick, but a fight will start no matter which option you go with.
After the fight, choose to pay some Gil to take the Protorelic off the bandits' hands.
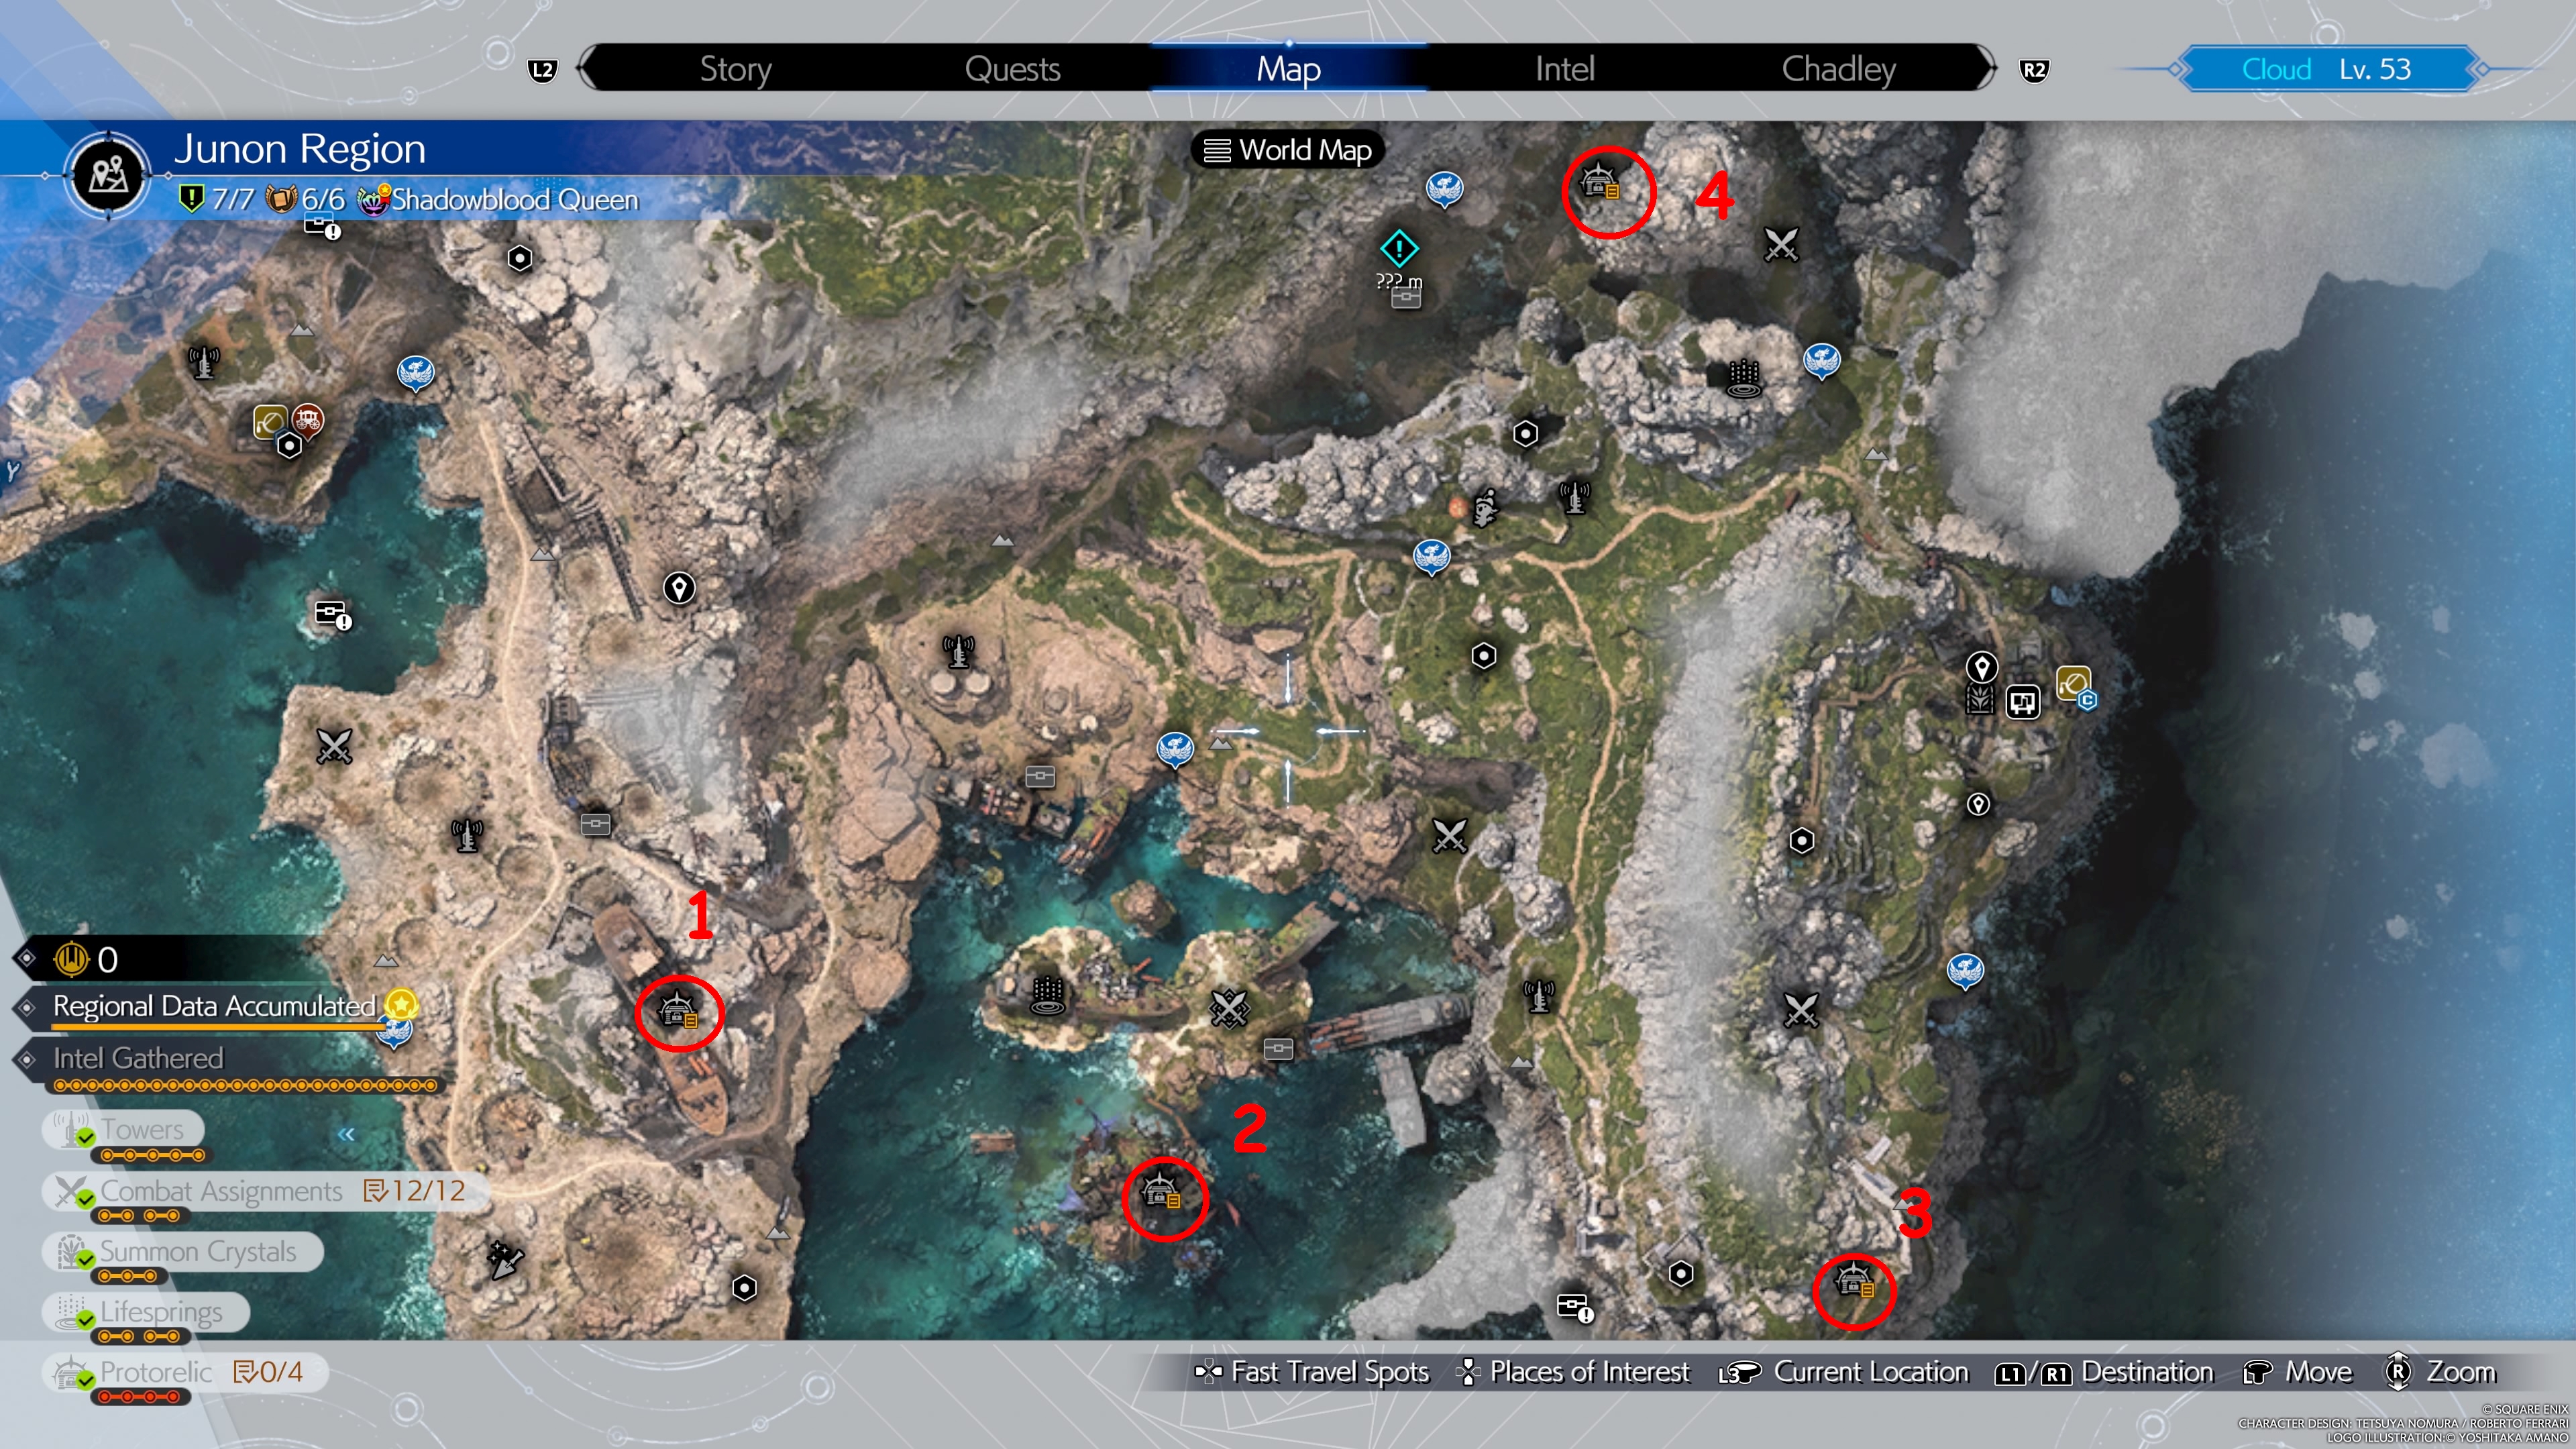
Junon Protorelic Phenomenon Intel
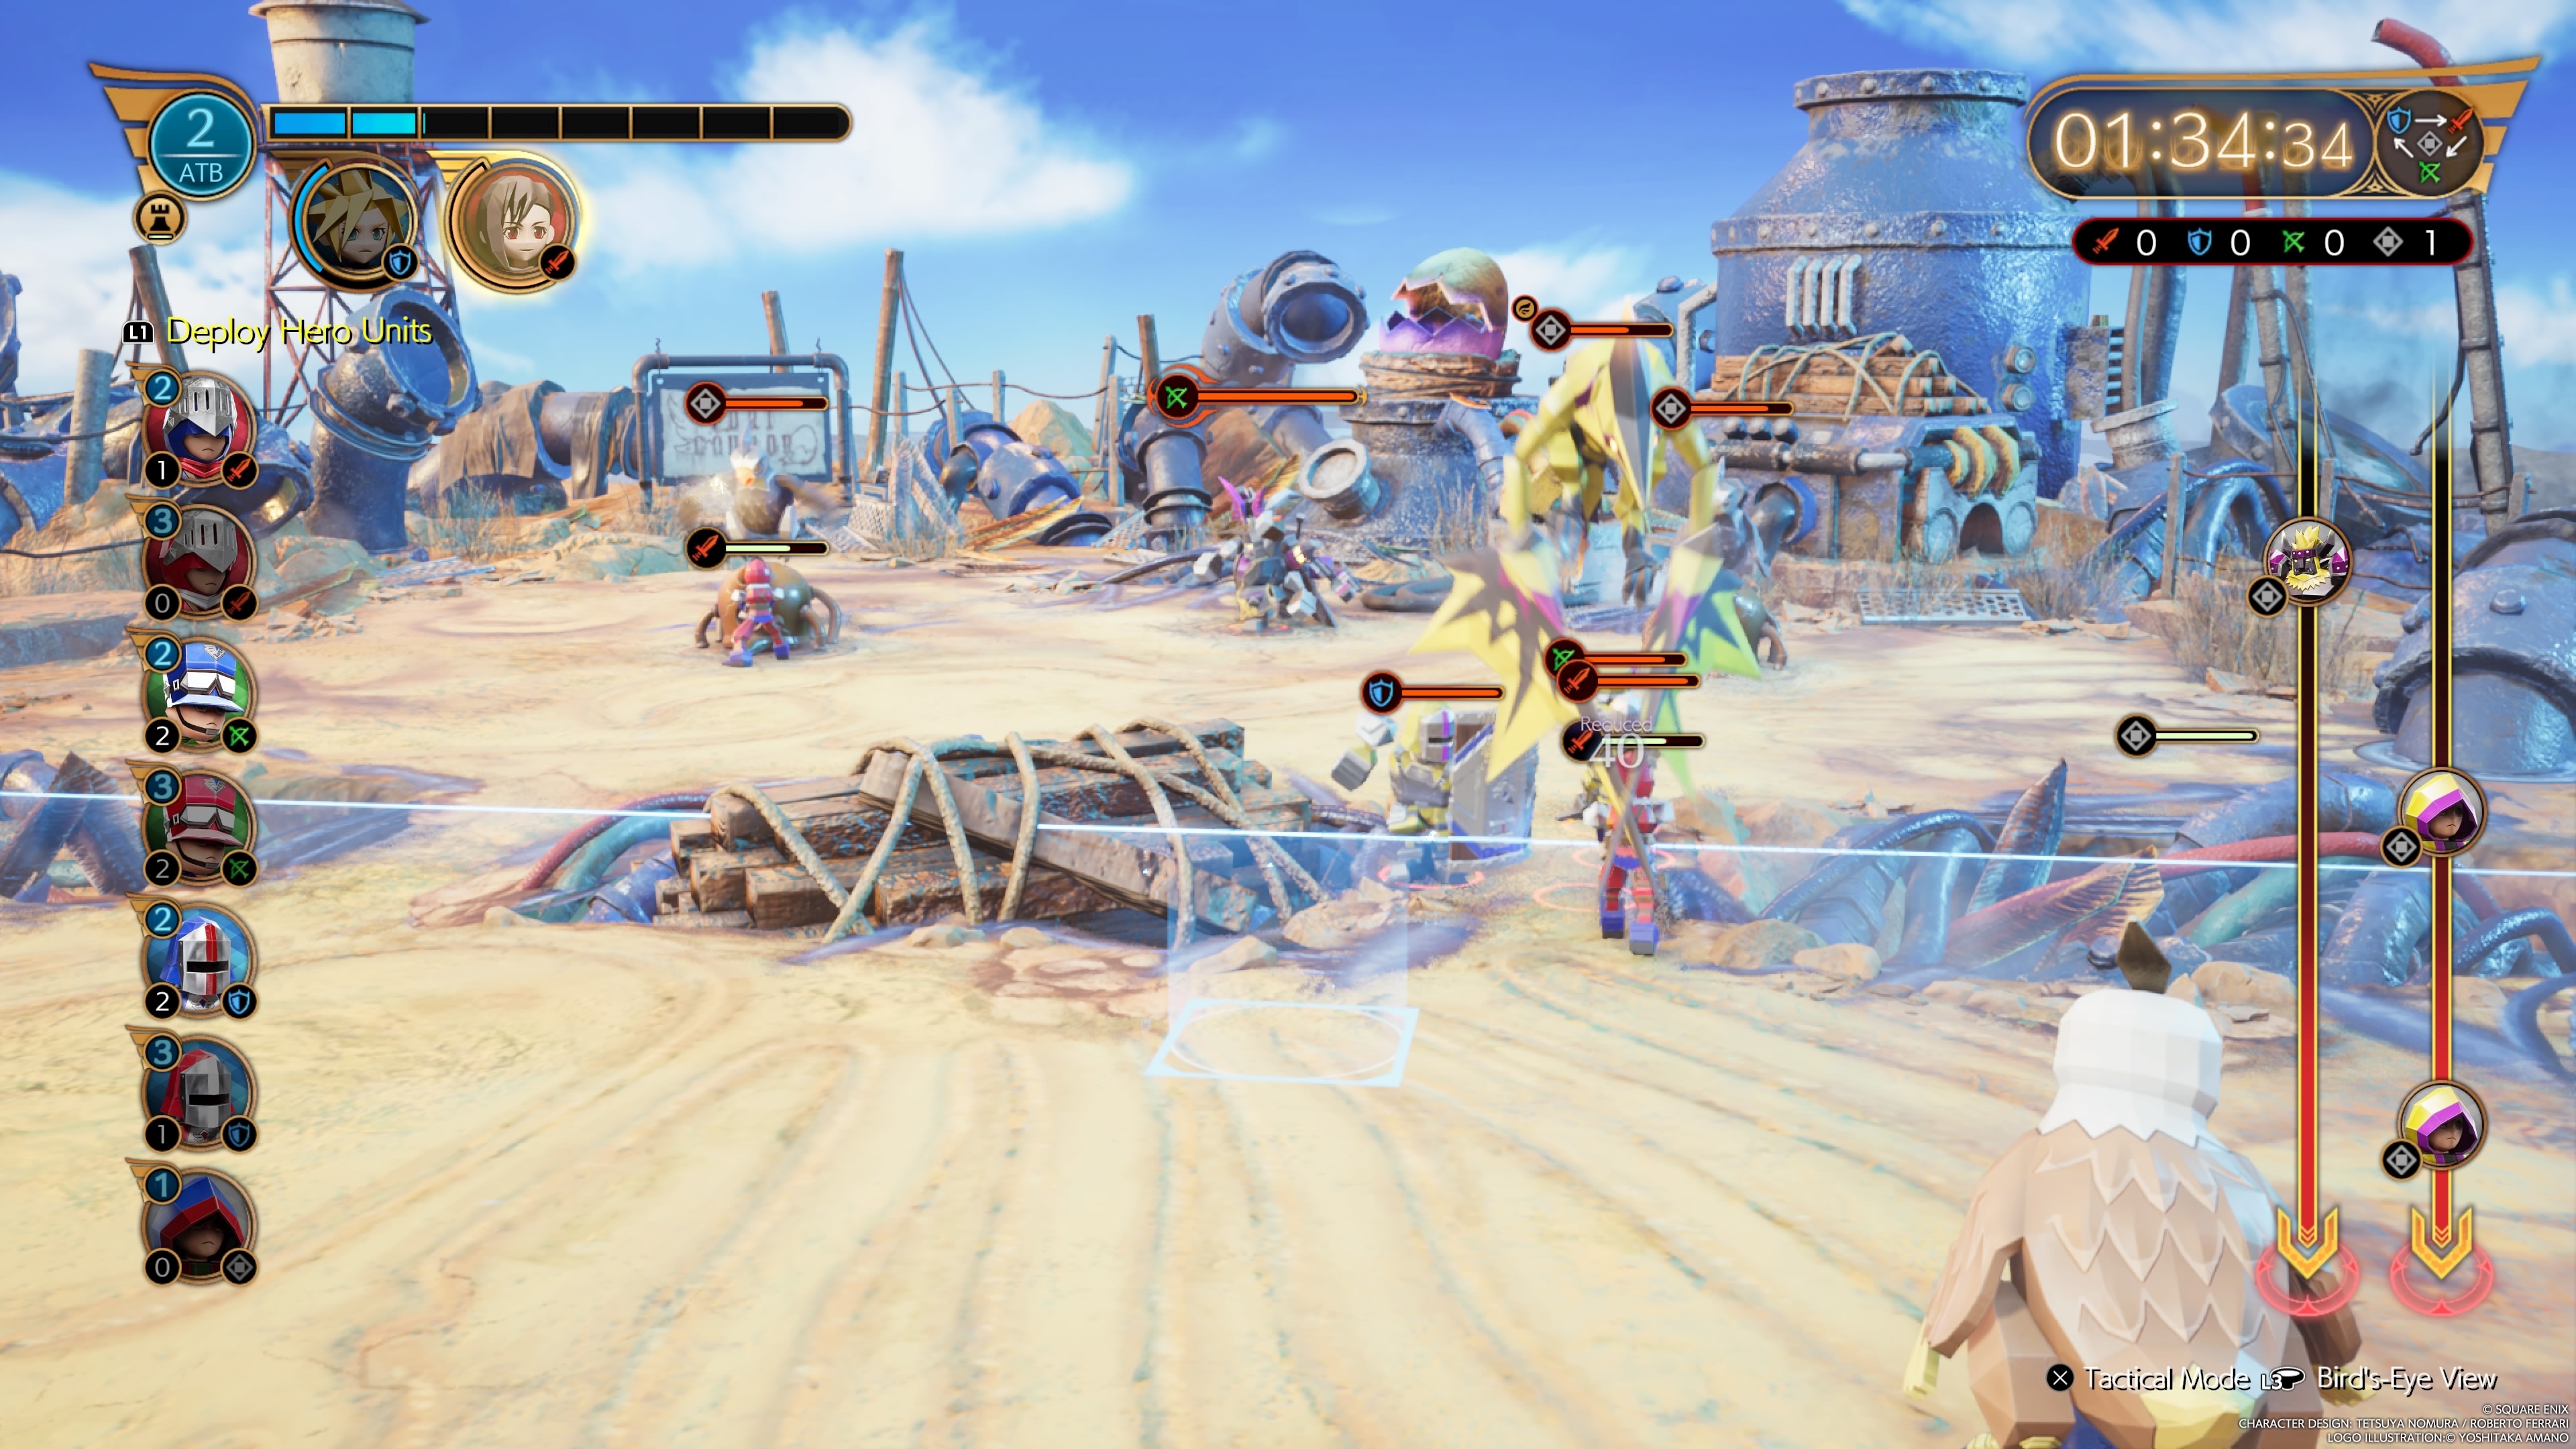
The Protorelic quests in Junon all revolve around the return of the Fort Condor minigame from Final Fantasy VII Remake Intergrade. Fort Condor's had a few changes since then, though, and players now get a pre-set range of units to use, as well as some new "Hero" units based on Cloud, Barret, and Tifa.
Fort Condor Tips
Here are a few general tips that we found useful for clearing the different Fort Condor challenges.
Keep the "elemental" matchups in mind, but don't forget that each unit has a function outside of their color:
- Red units do more damage to Green units, but also inflict the most damage up close.
- Green units are the only ones with the ability to hit flying enemies, and have advantage against Blue units
- Blues are usually slow and tough, but have an advantage against Red units.
- Cloud, Tifa, and Barret are essentially souped-up versions of the regular units, that can do a lot of damage when summoned. You'll need to spawn troops of the corresponding color to "charge" a Hero's summoning gauge.
- Cloud is a Blue defense unit.
- Barret is a Green ranged unit.
- Tifa is a Red vanguard unit.
- Support and artillery units can also be placed and summoned, as well, though these are limited in number, making placement and timing important.
- Clerics are very important to keeping your forces alive, because your units will often be at a disadvantage in terms of damage output or durability.
- Ballistas and Trebuchets can help lock down lanes and keep them defended while your forces advance.
- In later challenges, your primary opponent will be the clock, so you need to ensure that you summon enough units to keep up the pressure and try not to suffer excessive losses that will slow your damage output.
- One of our favorite setups uses Cloud and Barret as the centers, with tough, slow advances from Blue Enforcer units backed up by Green Rangers and Clerics, with Ballistas and Trebuchets securing the base.
- In this setup, use an Elite Enforcer with Cleric and Ranger support to push one lane.
- Summon Red Elite Vanguard units to deal with the other lane as needed.
- Summon static defenses (Trebuchets, Ballistas) on the enemy's side of the map to hold the territory.
- Summon Cloud or Barret as enemy units group up to wipe their wave and help clean up the enemy base.
- If all else fails, turn down the battle difficulty to easy. This speeds up your ATB charge gain, allowing you to field units more quickly. You won't be penalized for this.
Phenomenon Intel 1: The World of Fort Condor
This node is found in the beached ship on the western peninsula of Junon's map. After activating the mysterious board game, you'll be introduced to the Fort Condor minigame.
Your goal each time is to defeat the enemy boss character by summoning the different units you have at your disposal. Follow the instructions and you should accomplish the goal handily.
Phenomenon Intel 2: O Captain! My Captain!
The second Fort Condor minigame is located inside one of the shipwrecks sticking out of the water in Junon's central bay.
Proceed with the attack, keeping mind of the wolf-like units that will beeline for your base structures.

Phenomenon Intel 3: Princess in Another Castle
The third Fort Condor Protorelic node is only accessible after completing the "When Words Won't Do" side quest. Check out our side quest guide for more info on how to complete that one.
Once you've completed the quest and unlocked the Crow's Nest settlement, you'll be able to find the node located just north of the lighthouse at the very southeast section of the Junon map.
This is where time pressure can really work against you, but our favored strategy works here to keep up a relentless advance, while your Ranged units take down the incoming flying enemies. Consider summoning a ballista or trebuchet early to face the heavy Warlord unit coming down your right lane. The turret damage will soften it up for your other units.
New waves of units will come in when about 1 minute 30 seconds are left on the map. This is a good time to summon a hero unit to quickly wipe them out and keep your advance moving.
When the central tower hits about 30% health left, it will use a high-damage area attack that will wipe out most normal troops. If you're not under time pressure, try to hold back on summoning more troops a little bit so you can quickly replace your losses at this point.
Phenomenon Intel 4: Interdimensional Warlock
The fourth and final Fort Condor node is located in the far north of the map, in the mountainous portion of Junon. The area is accessible by heading northeast from the remnawave tower in the center of the map. You'll have to climb a series of cliffs on your chocobo to access the node.
This is the hardest fight of the sequence, because the headquarters unit (Gilgamesh) can change its elemental affinity, rotating between red, green, and blue. Most of the regular units are Gray-element, meaning they have no specific resistances.
Try not to summon your units too far forward, as they'll run into the enemies and then get wiped out by the headquarters attacks. Instead, summon them on your own side so they can advance while being covered by static defenses like ballistas and trebuchets. When the advance is far enough along to cross over, summon a Hero unit and back them up with clerics.
Don't summon both heroes at the same time unless you need their entry attack to clear the last bit of the headquarters' health pool, as the affinity change attacks can wipe out your heroes. Instead, stagger the summons so that they have fresh HP when they enter the field.
Corel Protorelic Phenomenon Intel
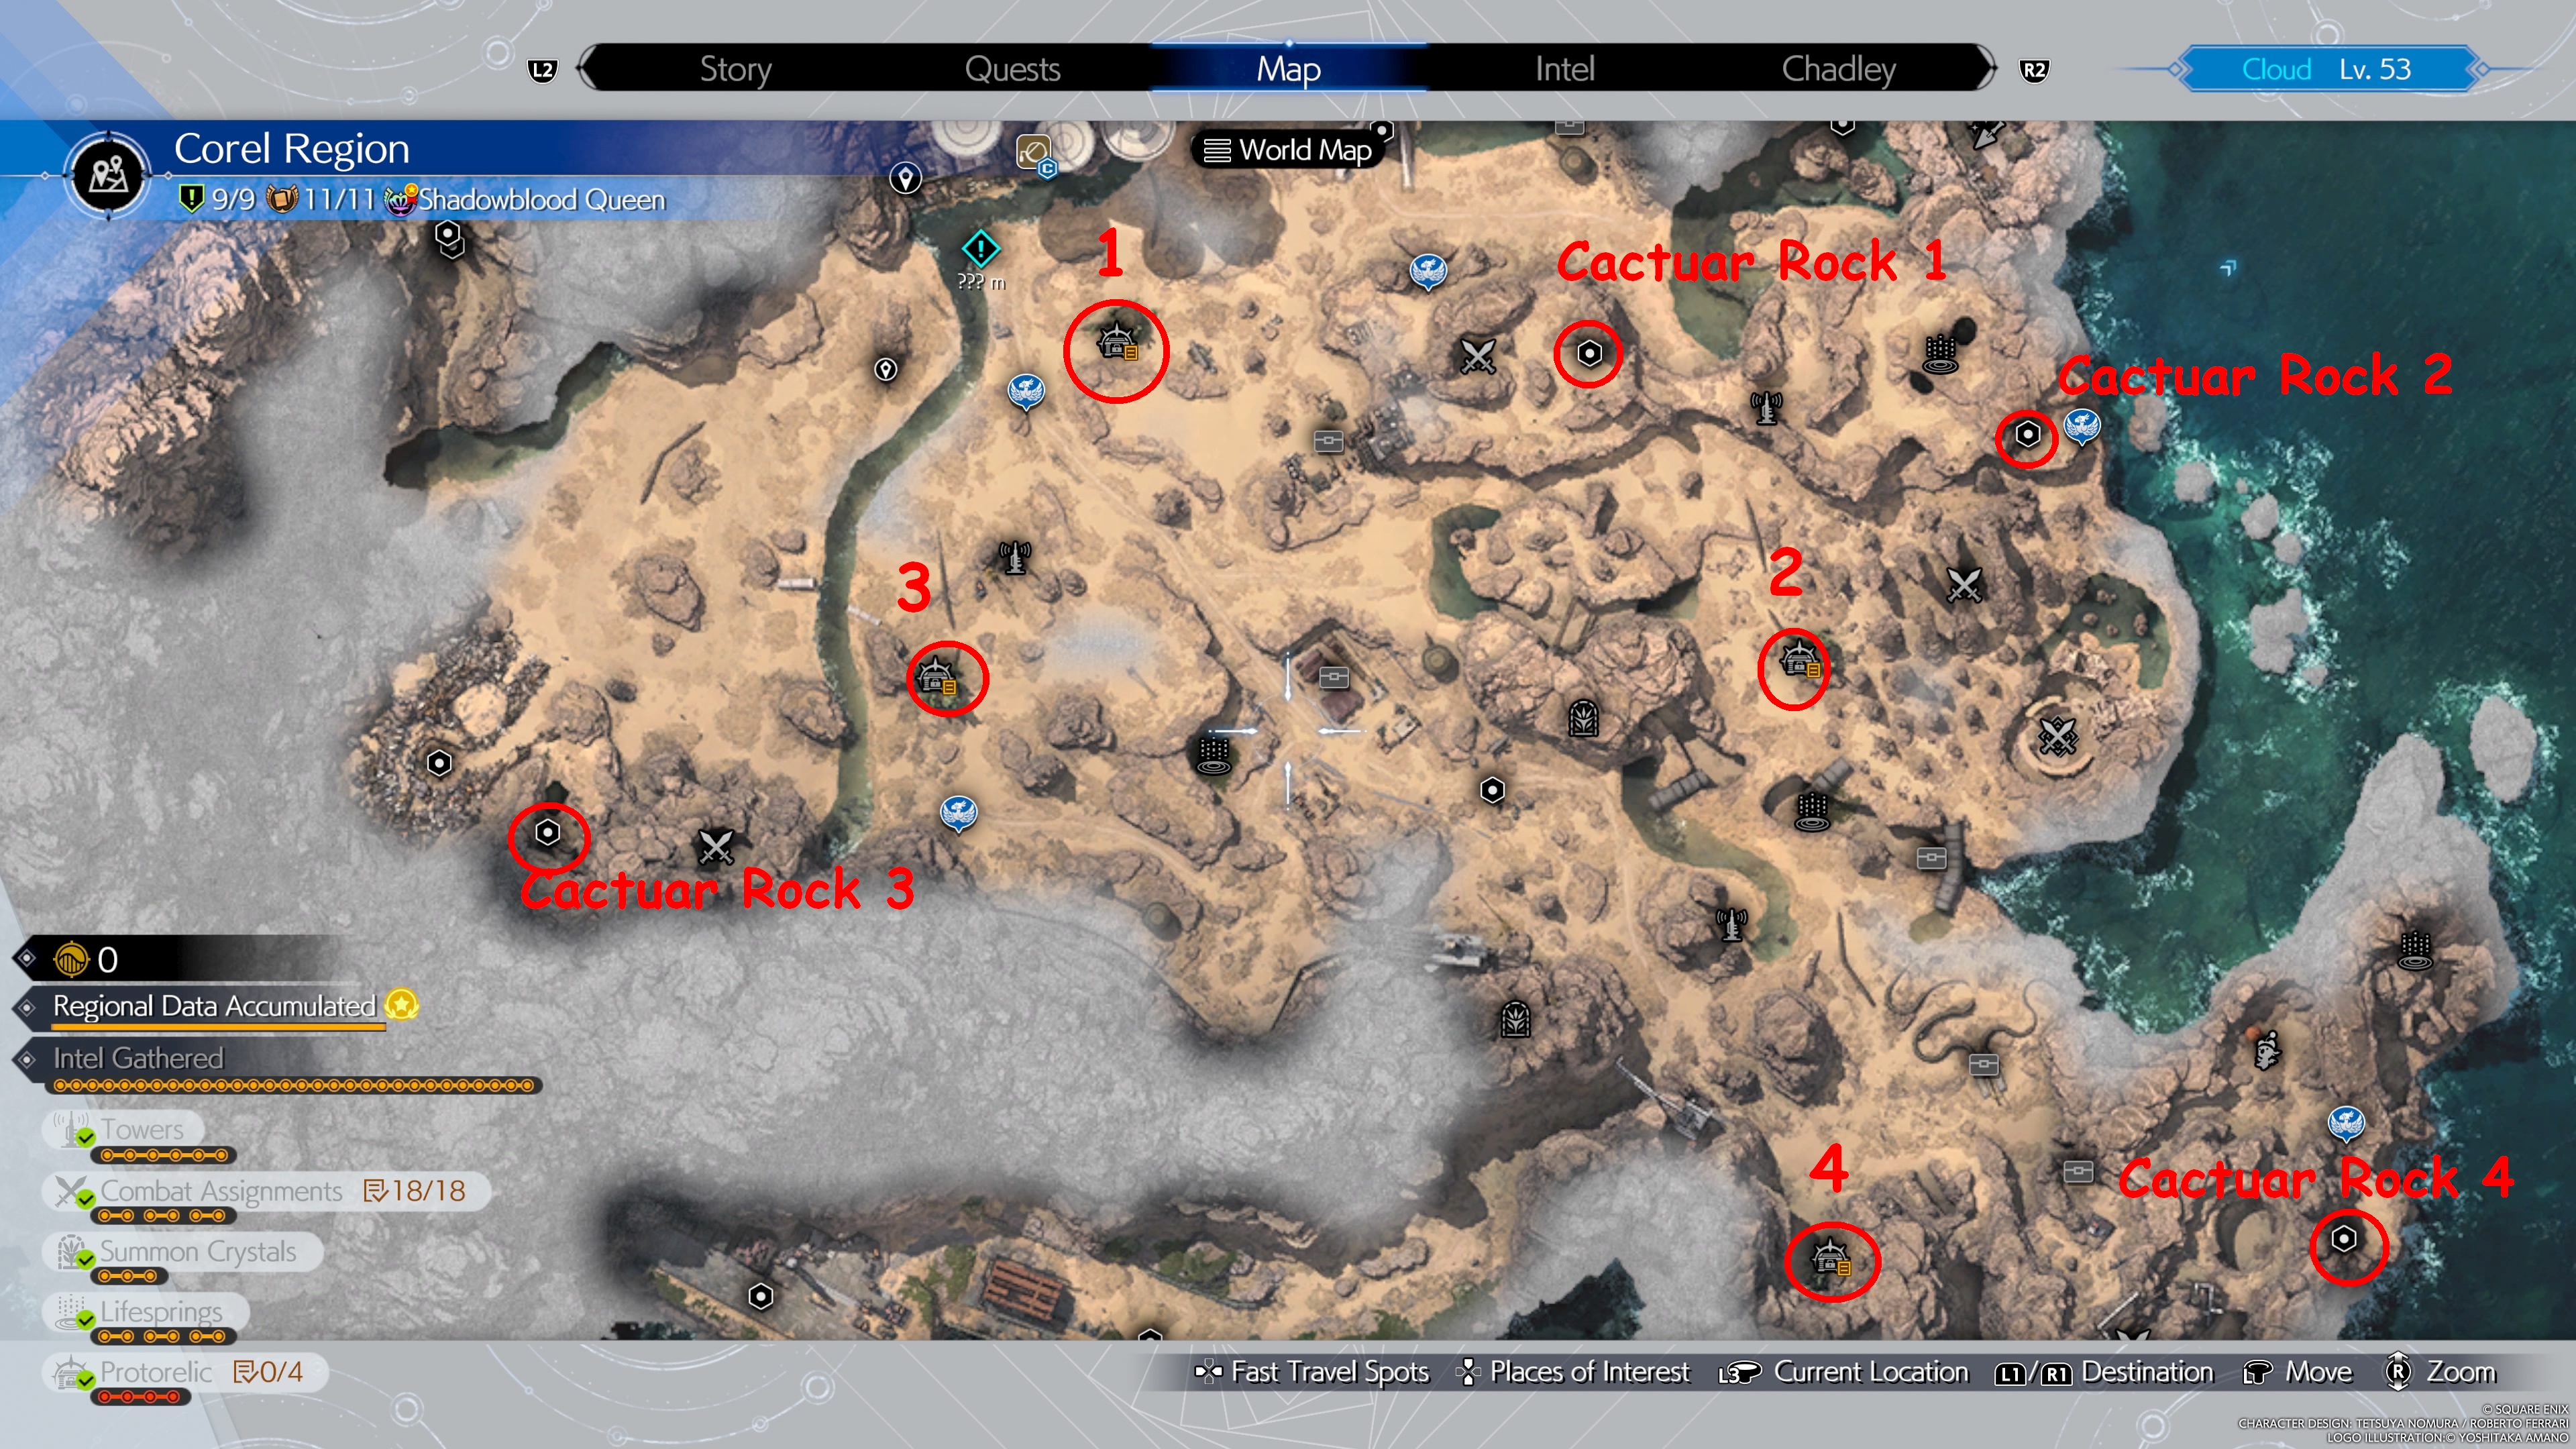
Corel's Protorelic quests can't be completed all in a single go, with only the first two nodes available to tackle before Chapter 12. After Chapter 12, you'll be able to complete the remaining two.
Unlocking each Corel Protorelic trial requires Cloud and the party to first visit a special Cactuar Stone, using a relic that fires a laser beam in the stone's direction to locate it. We've highlighted each Cactuar Stone on the map to make them easier to find.
The Corel Protorelic trials are all based around a special combat minigame called Cactuar Crush. There you'll need to battle small Cactuar enemies using a single party member and amass points for rewards.
Phenomenon Intel 1: Treasure Protector G
The Cacutar stone for your first Corel Protorelic trial is located just to the east of the site itself, atop a hill. Visit the Cactuar Stone to trigger a brief battle that rewards you with the ability to enter the dilapidated reactor. There you'll meet Kid G and take on your first Cactuar Crush battle using Yuffie.
Use Yuffie's ability to switch between magic and physical damage using Elemental Ninjutsu, as well as using her ranged and melee toggle to deal the appropriate damage to the Cactuars. Some Cactuars can only be damaged by magic, while others by physical.
Use abilities like Windstorm to quickly deal AOE Aero damage and rapidly clear the field. Target rainbow Cactuars to add time to your clock, as well.
Phenomenon Intel 2: Kid G's Trial
The second modular reactor can be unlocked by visiting a Cactuar Rock to its northeast. The Rock can be accessed by climbing the cliff wall. Follow the telltale yellow-painted blocks to get to the stone's perch.
After you unlock the trial and begin the second round of Cactuar Crush, you'll be forced to use Aerith. Aerith's abilities will be made slightly different compared to her normal combat. Use her light and dark wards to up the damage to the appropriate Cactuar type. Her Sorcerous Storm and her charged ranged attack can also dish out a lot of AOE damage to clear the fields quickly.
Phenomenon Intel 3: Unfriendly Competition
This node only unlocks after you've completed the first two nodes as well as finishing Chapter 12.
You'll find the Cactuar Rock for this node to the southeast of the Scrapyard Prison Cell, through a cave big enough to drive the buggy through.
After unlocking the Modular Reactor, enter and begin a new round of Cactuar Crush, once again in control of Yuffie. The score targets will be higher this time, but taking advantage of Yuffie's weapon abilities, like Doppelganger and Banishment will help deal with the increased output requirements.
Phenomenon Intel 4: Bladesman of Legend
The final Corel Protorelic node can be unlocked by visiting a well-concealed Cactuar Rock. Travel to the eastern edge of the desert. A nearby Chocobo stop will serve as a convenient waypoint. There you'll see a series of yellow-marked climbable handholds that will ultimately lead you to an outcropping facing the sea and not visible from other portions of the map.
After activating the Cactuar Rock, you'll unlock the Reactor and the last Cactuar Crush minigame. You'll control Aerith once again. Some of the Cactuars in this 2nd challenge will protect themselves with Manaward, which you can destroy by using Aerith's mode-exclusive melee attacks.
Following the conclusion of the quest, Kid G will challenge you to a fight. Defeating him will unlock Hard Mode challenges for Cactuar Crush, but these aren't required to progress the Protorelic quests.
Gongaga Protorelic Phenomenon Intel

Actually finding Gongaga's Protorelic nodes can be the steeper challenge than completing the combat-based tasks at each node. Check our map to show the rough route you can take to find the hidden Shinra facilities that hide the Protorelic pieces.
You also won't be able to access the nodes without the local Chocobo, so expect to be able to handle the quests only after most of the section's key events have passed.
Phenomenon Intel 1: Turks Training
The first Gongaga Protorelic quest is found in the far south of the regional map, in the abandoned cargo port, near the Cliffside Storehouse cache location.
Check the area until you find a small fenced-off section that hides a set of stairs leading underground. Follow the stairs until you encounter a Turks-brand combat simulator with a special scenario pre-programmed into it.
Posing as bodyguards of a virtual Rufus shinra, you'll need to fight off three waves of enemies.The enemies themselves aren't any different from standard Shinra enemies, so they're nothing new at this point.
The chest at the back of the room also awards you 3 Mist Mega Potions.
Phenomenon Intel 2: Dissident Destruction
The next node is only accessible by a bouncing off a mushroom while riding your Chocobo. Zoom in on the map and find the mushroom encircled on the map. Once you've bounced up, locate a deep hole in the ground with a rope to climb down.
Once at the bottom you'll see some minor fiends and the entrance to the combat simulator for another 3-wave battle. The room's chest contains 2 Hi-Ether items.

Phenomenon Intel 3: His Personal Escorts
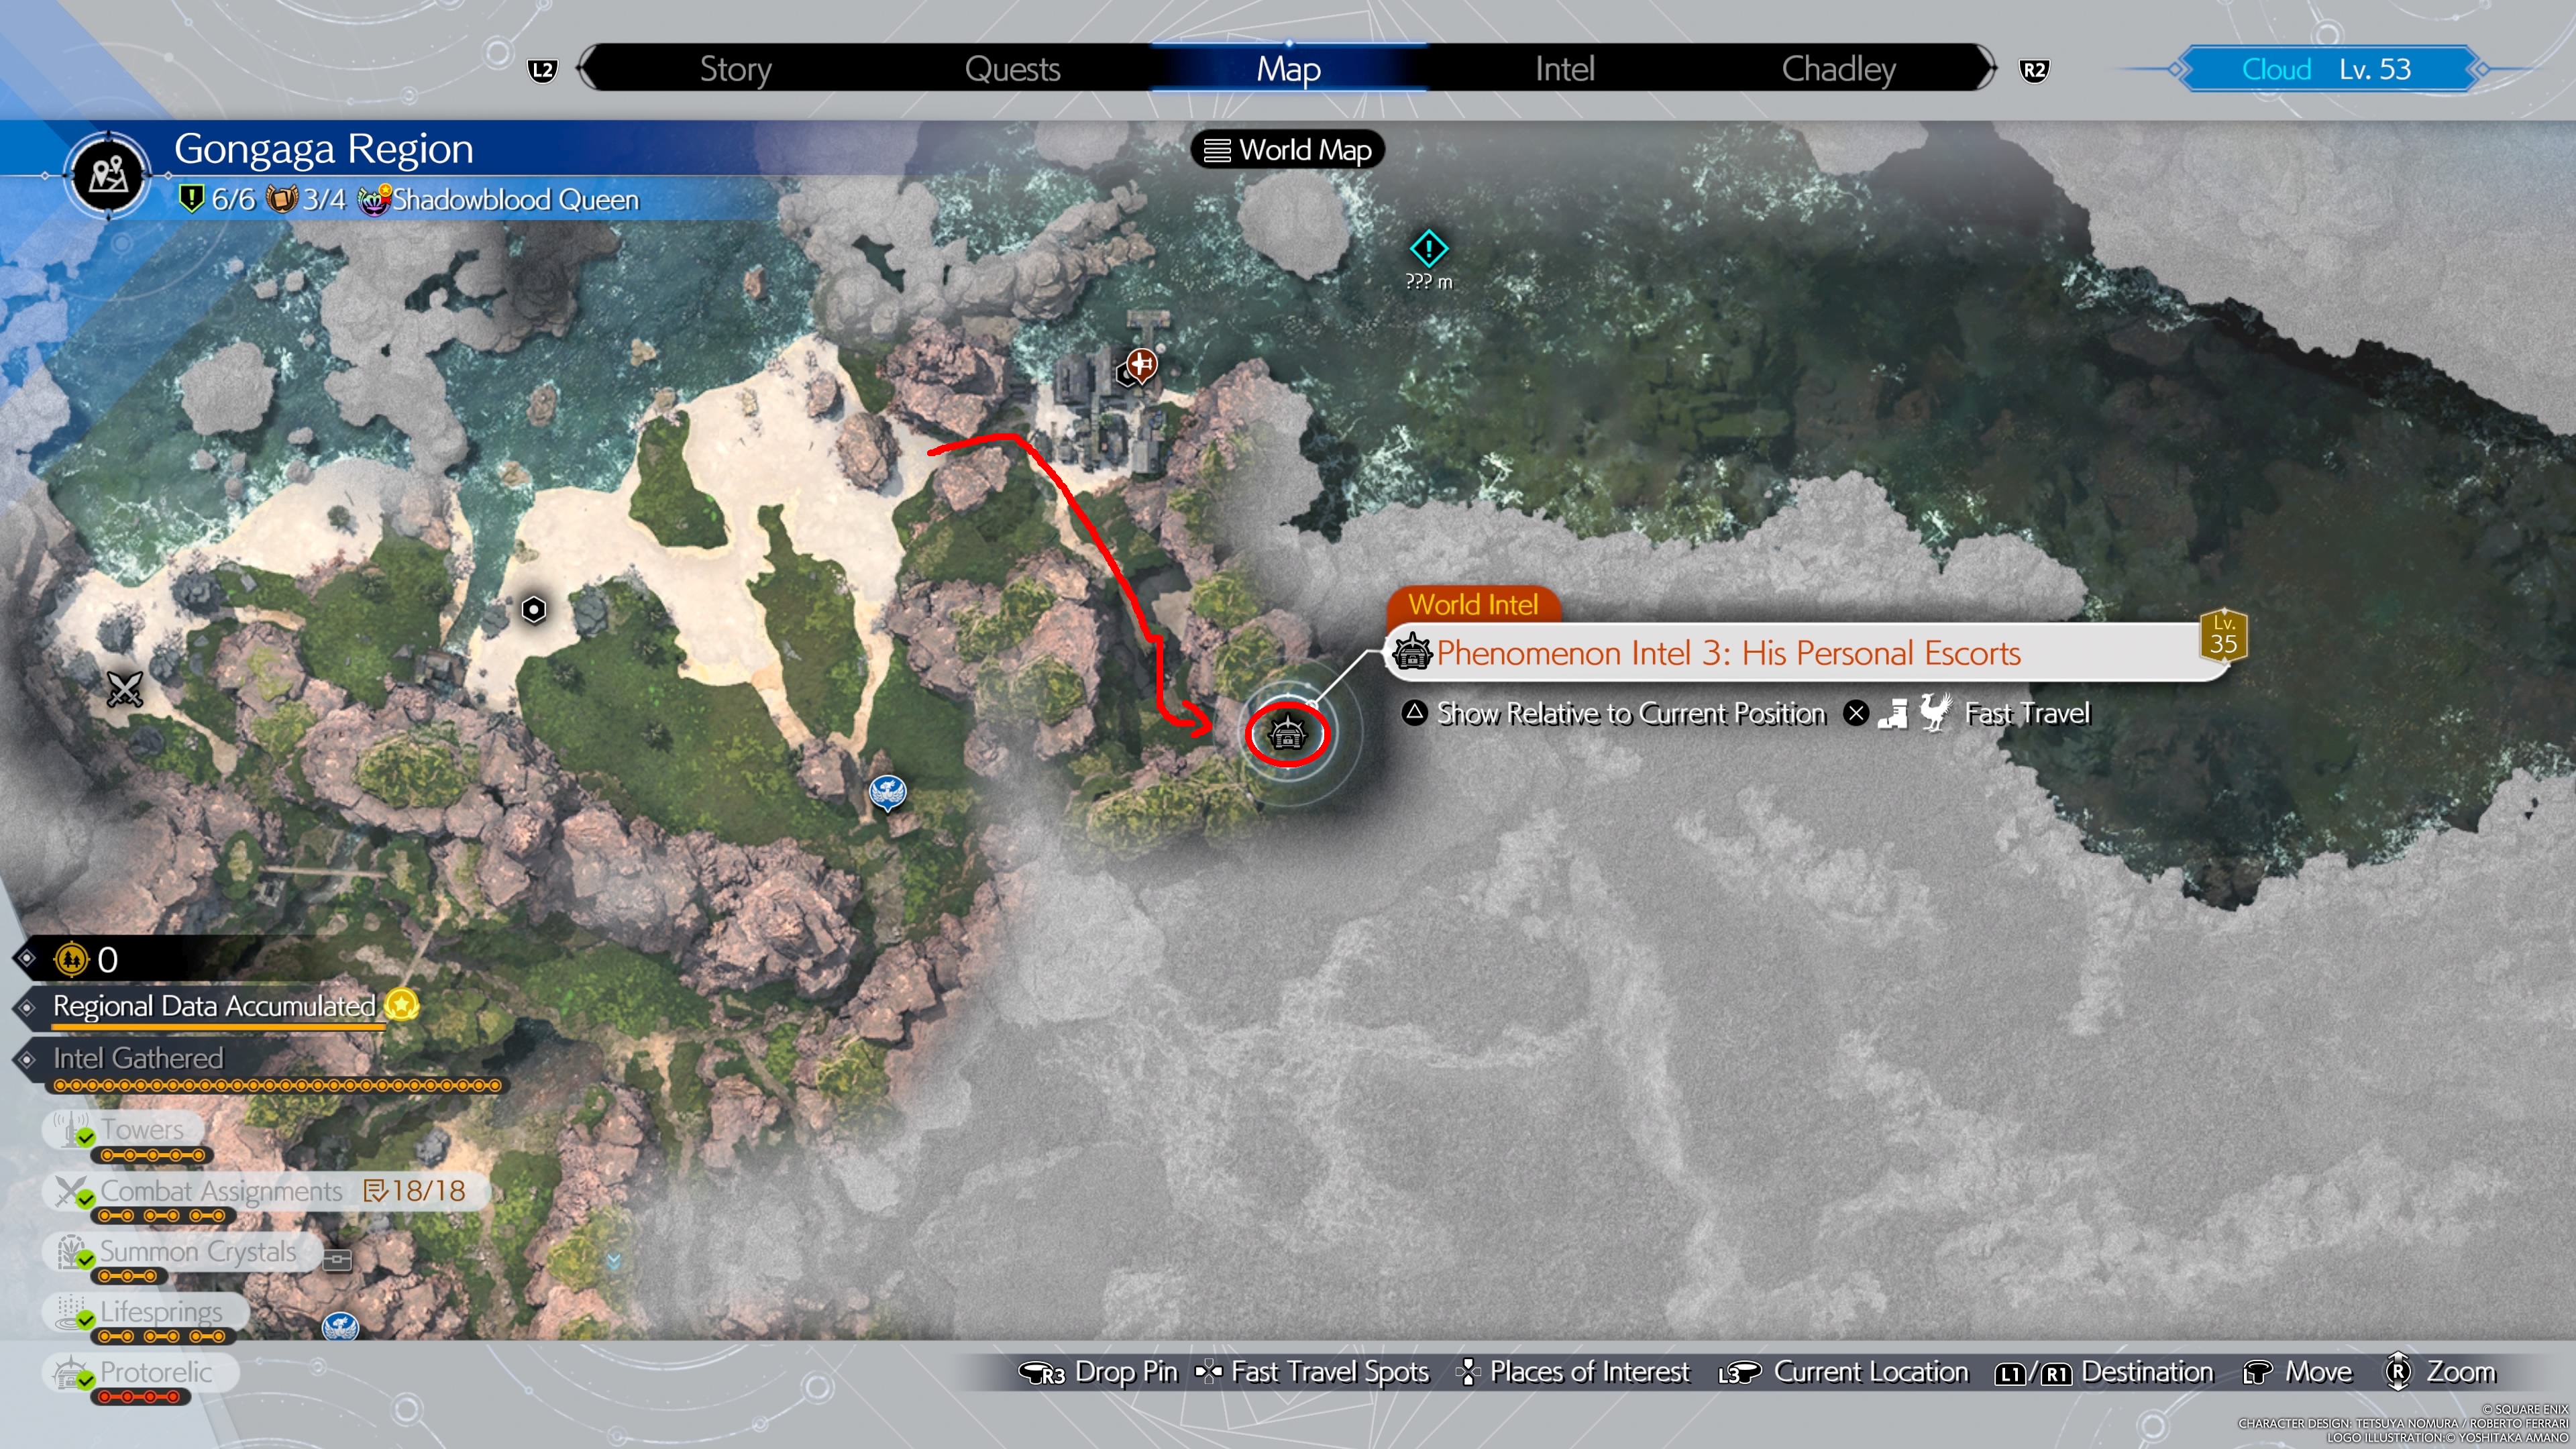
Ride all the way north to the shoreline separating Gongaga from Corel. From the shore, turn east and seek out the nearby Gongaga Port (this is a fast travel point you can simply teleport to if you've already unlocked it).
From Gongaga port, ride south and bounce off the mushrooms to find the facility entrance, where another three wave battle and an Elixir await.
Phenomenon Intel 4: The Deadliest Game
The map placement for the final Gongaga Protorelic quest suggests that the node is accessed from the Gongaga airstrip, but in reality it can only be visited by passing through the ruins to the south.
The nearest node to teleport to is the Fiend Intel fight to the far west. From there, backtrack slightly and find a passage through the ruins that leads into a tunnel that emerges behind the facility.
Once inside, you'll face your final training exercise: A 3-wave battle that includes fights against simulated versions of Rude and Elena. You'll receive the Protorelic piece for your trouble, and a Prayer Materia from the chest.
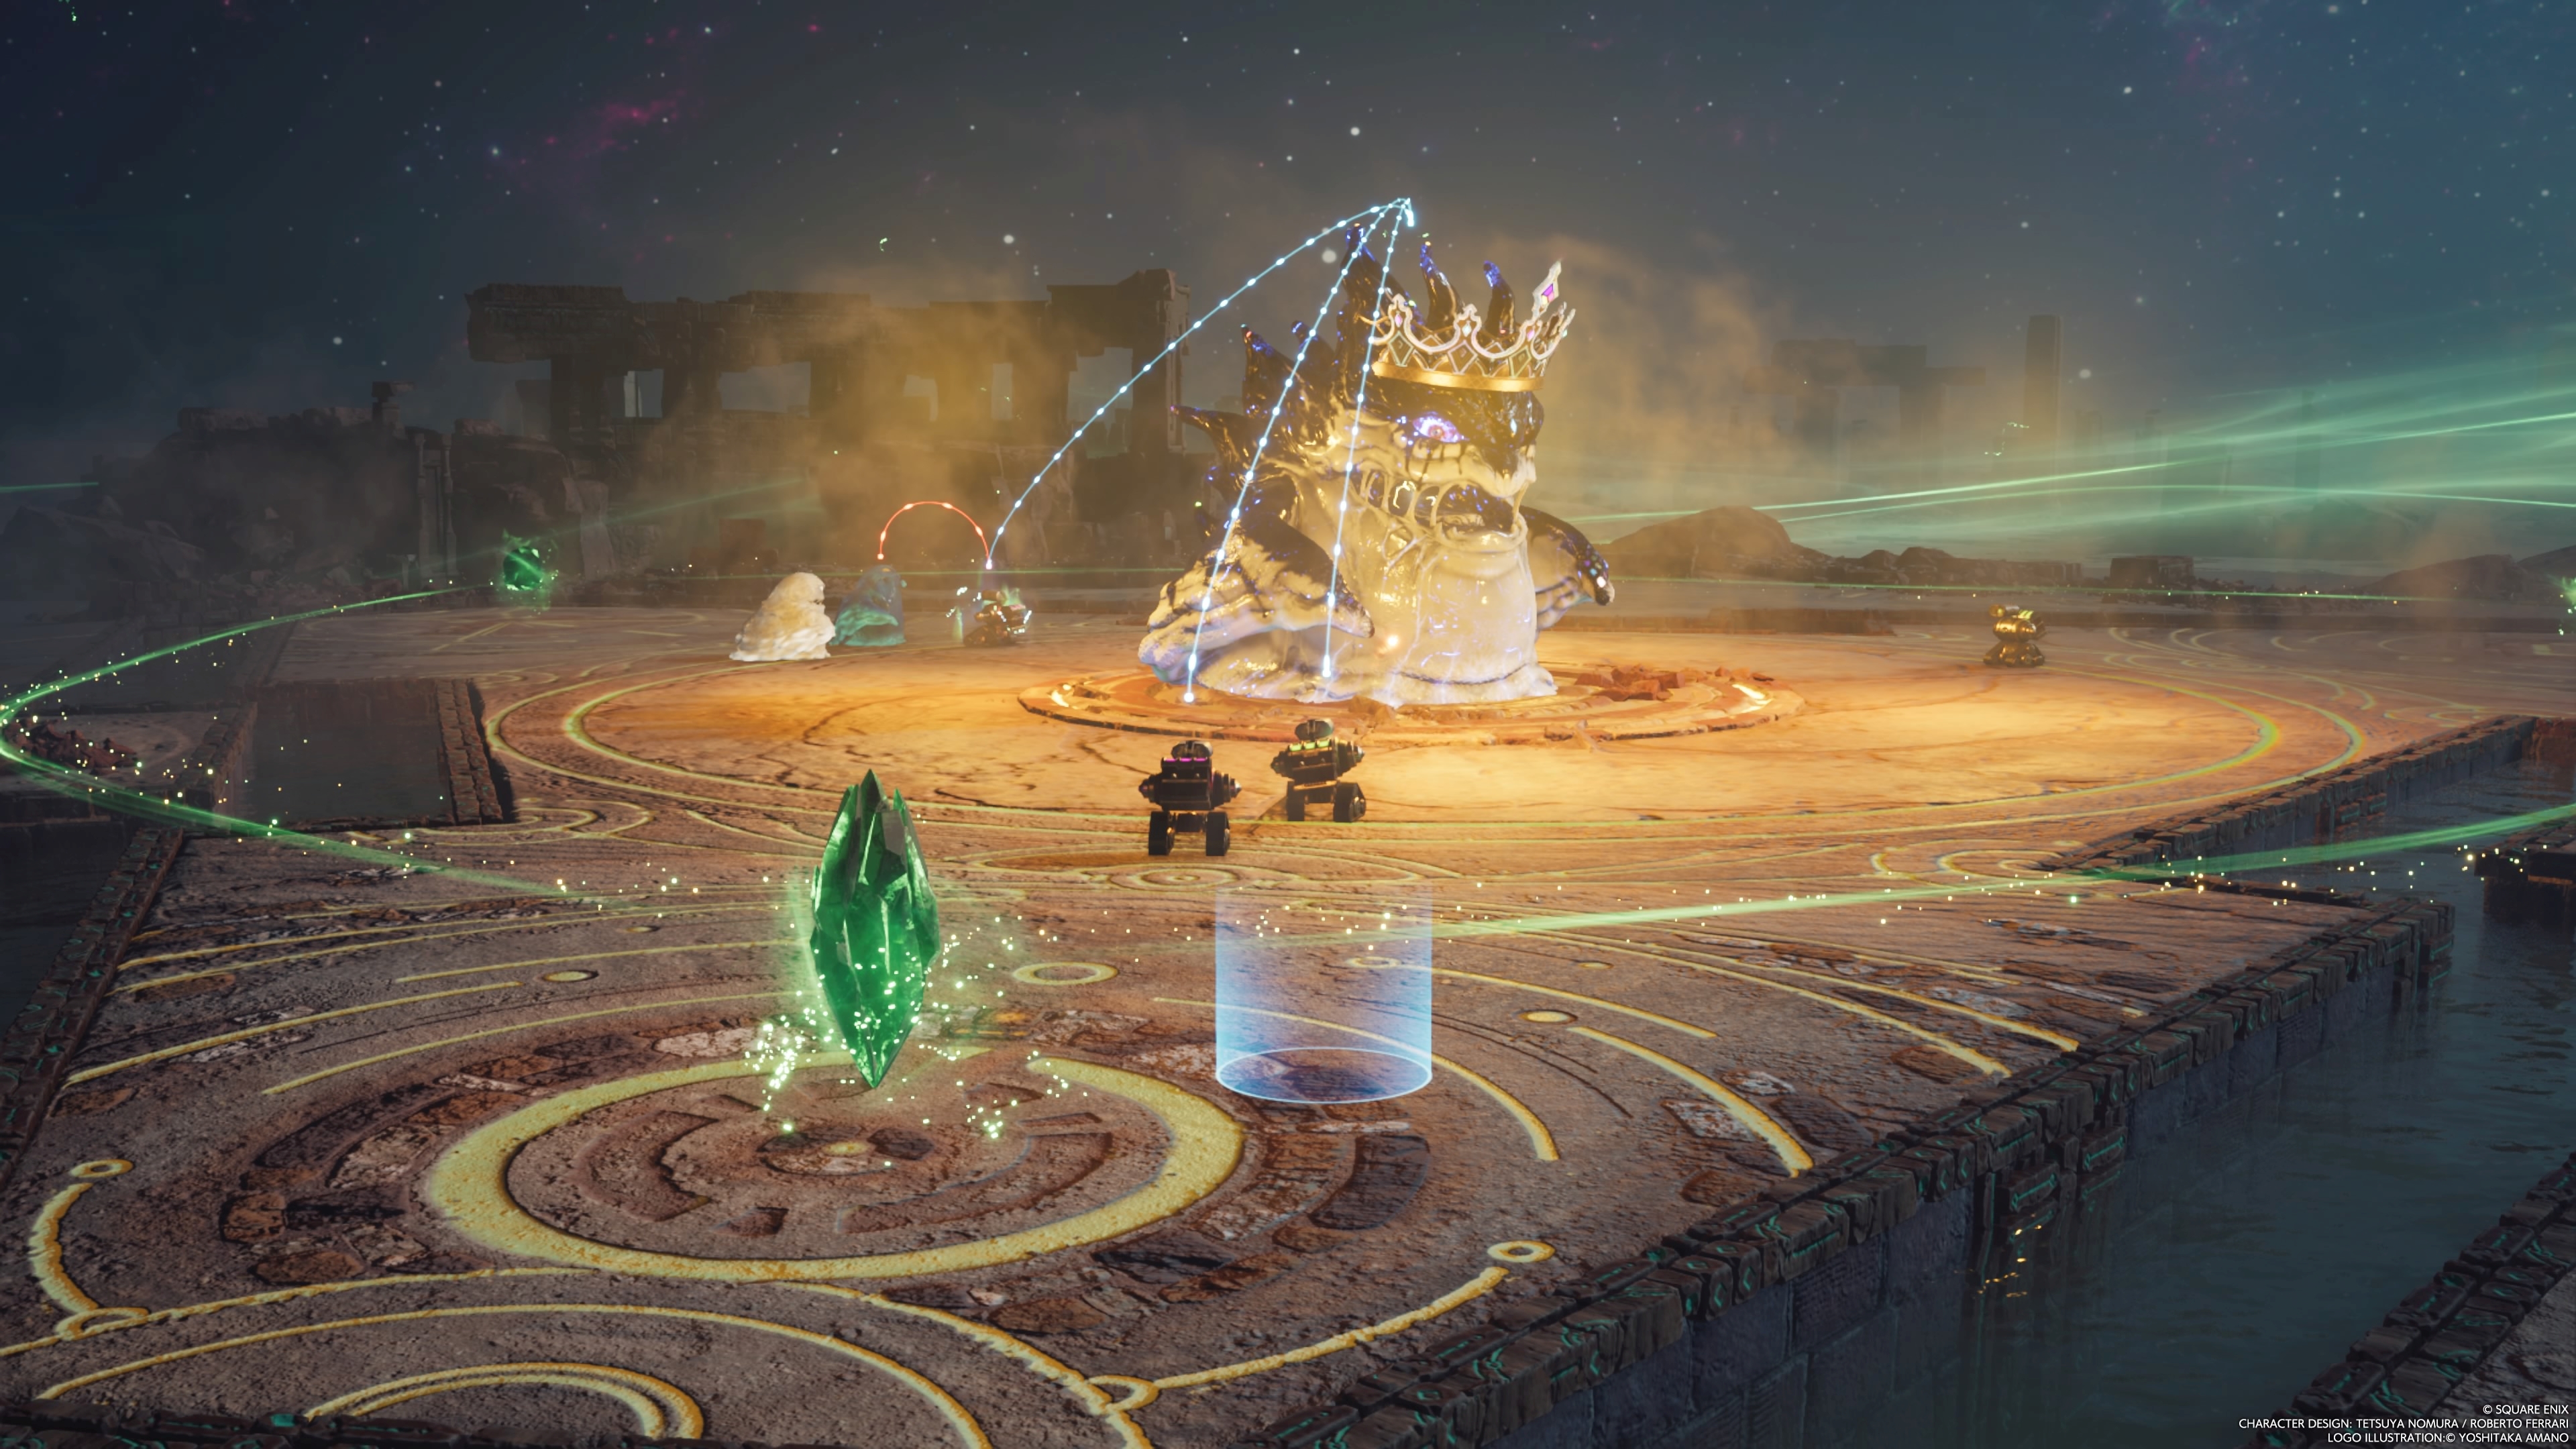
Cosmo Canyon Protorelic Phenomenon Intel
Cosmo Canyon's Protorelic quests treat you with familiar faces from Final Fantasy VII Remake and the Intergrade Yuffie DLC chapter, but also introduce a brand-new minigame: Gears and Gambits. The new minigame allows you to program robotic drones with a set of instructions in a similar manner to Final Fantasy XII's quasi-AI Gambit system.
Gears and Gambits Tips
You'll use the drones to defeat a small army of Flans attempting to advance on your positions. Each enemy type has an elemental weakness that you can exploit using your robots' abilities. The system allows for surprising complexity, though we managed to clear the normal battles just using the default, pre-built Gambit settings. An Auto-Program option is also available in Normal difficulty that gives you a recommended set of robots to use.
Some other configurations can be more reliable, though, particularly once you start unlocking more advanced Gambits. Our one-size-fits-all method involves deliberately weakening two of the three available drone templates to make them cheaper to summon, then flooding the field with them. This strategy works well since each of the elemental robot abilities has a limited number of uses, which means you must constantly replace your robots anyway, even if they're otherwise tough enough to survive damage.
This setup worked well for us, with minimal tweaking in each round to counter the enemy elemental makeup:
- T1 Robot
- Foe: Weak to an Element: Thunder Shot x4
- Foe: Shock+ x1
- Foe: Lariat
- Self: Haste Field x1
- T2 Robot
- Elemental Weakness Priority: Fire Shot x4
- Foe: Missile x2
- Foe: Lariat
- Self: Modify HP & Cost (Cost-40, HP-200)
- Self: HP+150
- T3 Robot
- Self: Augmentation x1
- Foe: Weak to an Element: Blizzard Shot
- Foe: Gravity Shot
- Self: Modify HP & Cost (Cost-20)
- Self: HP < 50%: Cure Shot
In this setup, one can afford to "spam" summon the cheaper T1 and T2 robots, while occasionally summoning the T3 Robot. Summon bots based on the elements of enemies advancing down your lanes. In the latter stages, when the bosses can change their affinity, having more bots on the field will allow you to inflict higher burst damage.
For portal skills, healing skils like Regenga and damaging skills like Comet will help you turn the tide or finish off the boss as necessary.
Note that Gears and Gambits Hard Mode is a different beast, with tougher enemies and rules that restrict your robot-spamming, so this strategy is more tuned for an easier clear of Normal Mode.
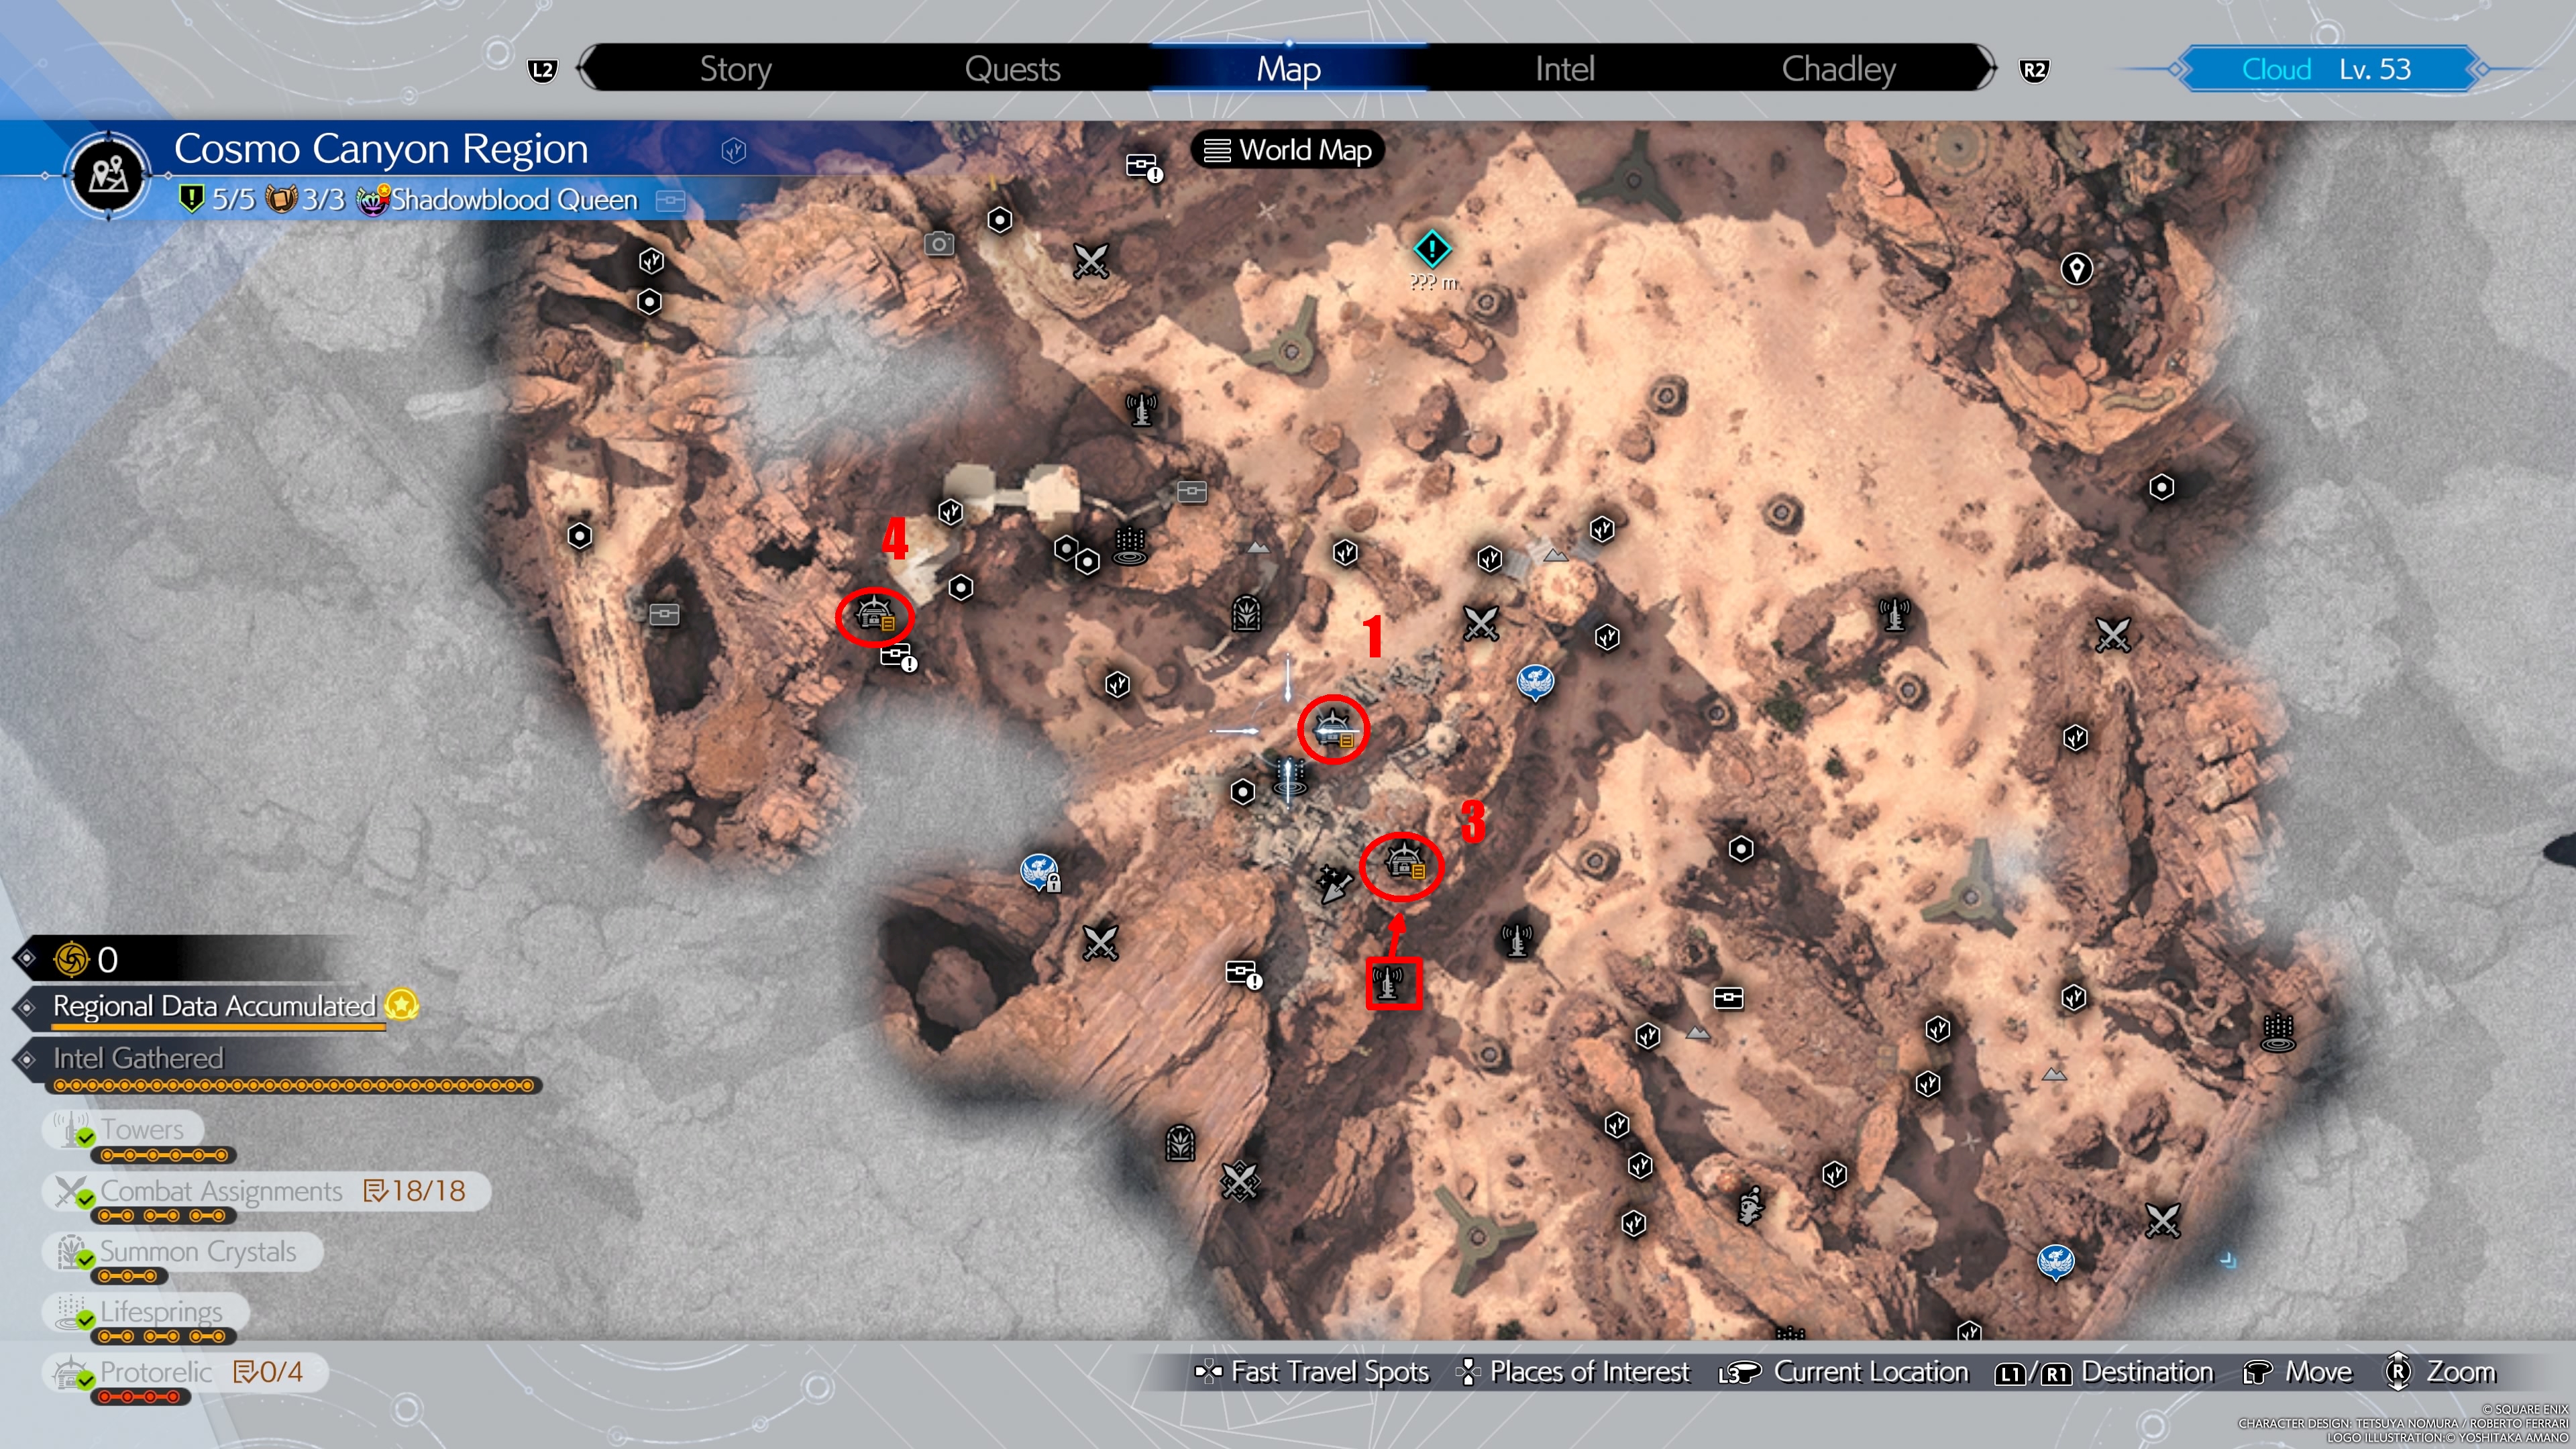
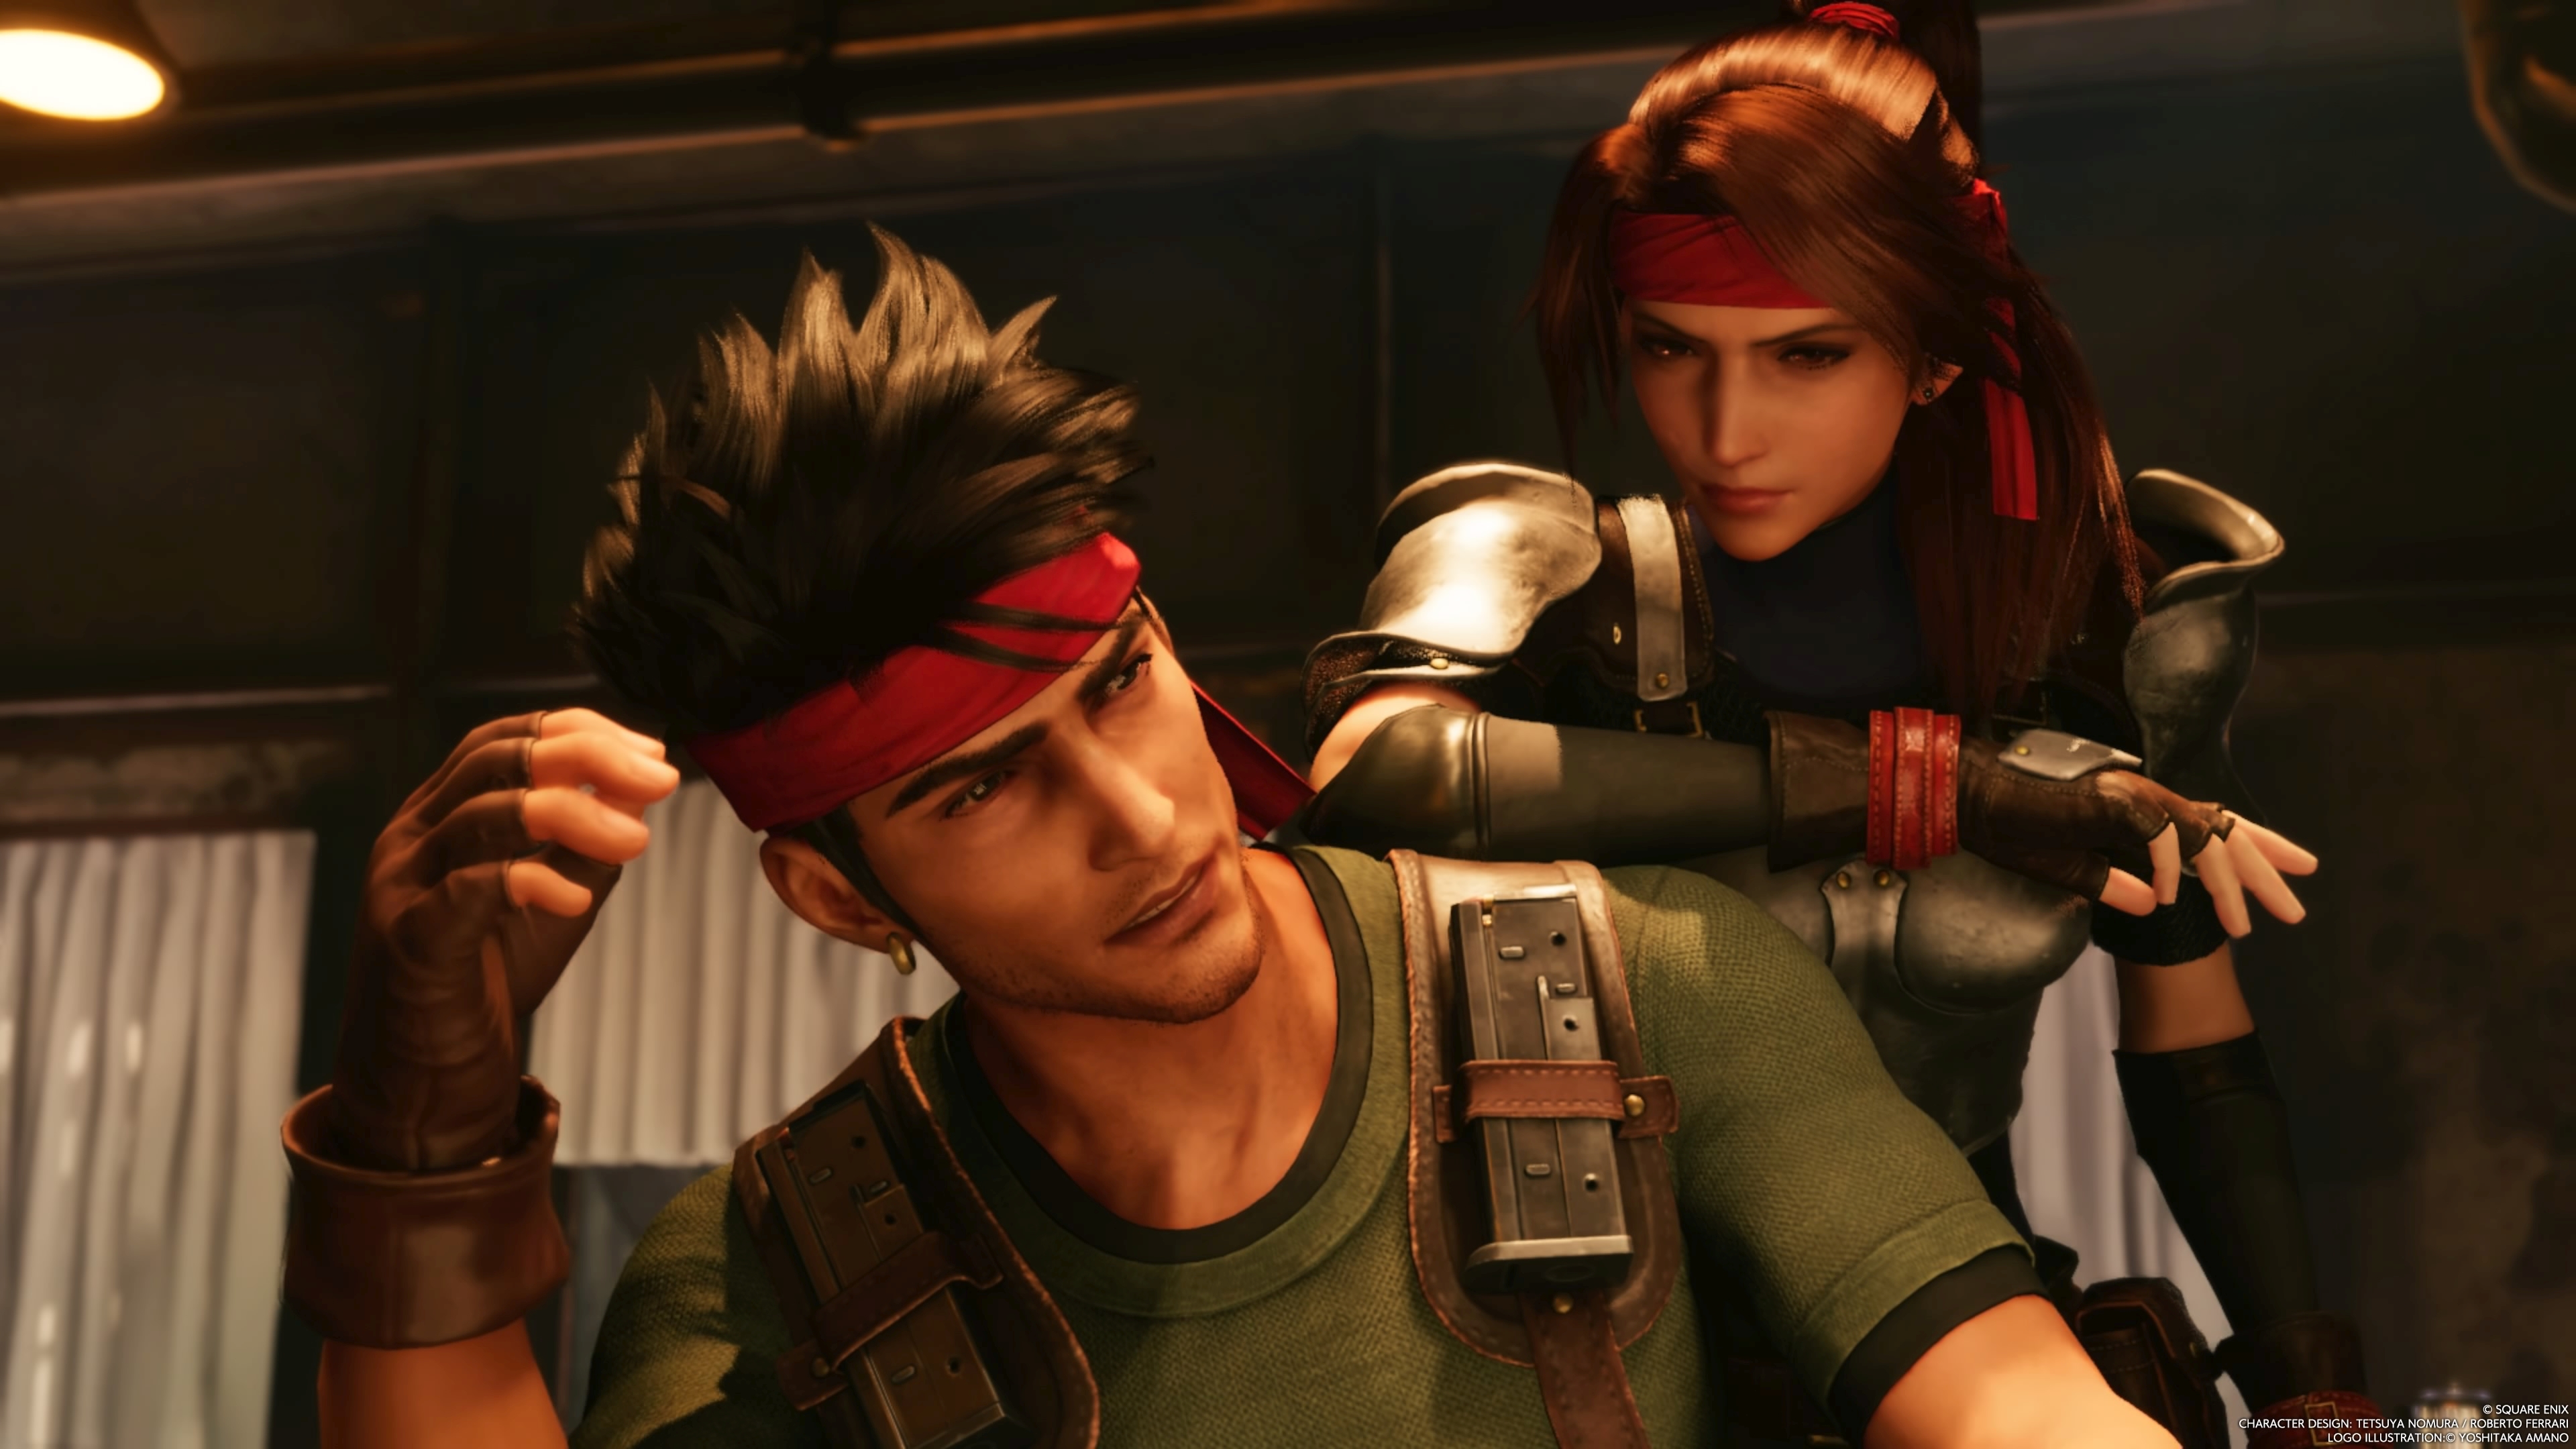
Phenomenon Intel 1: Avalanche
The first Phenomenon Intel quest for Cosmo Canyon will become available after completing the major story quests for the area. Chadley will inform you when it's available. Once ready, trek to the center of the map and climb the slope leading up to the node, where you'll meet up with some of the Midgar Avalanche crew. You'll then be introduced to Gears and Gambits and walk through the first match.
Try using the preset robots and get a feel for Gears and Gambits flow.
Phenomenon Intel 2: Left Behind
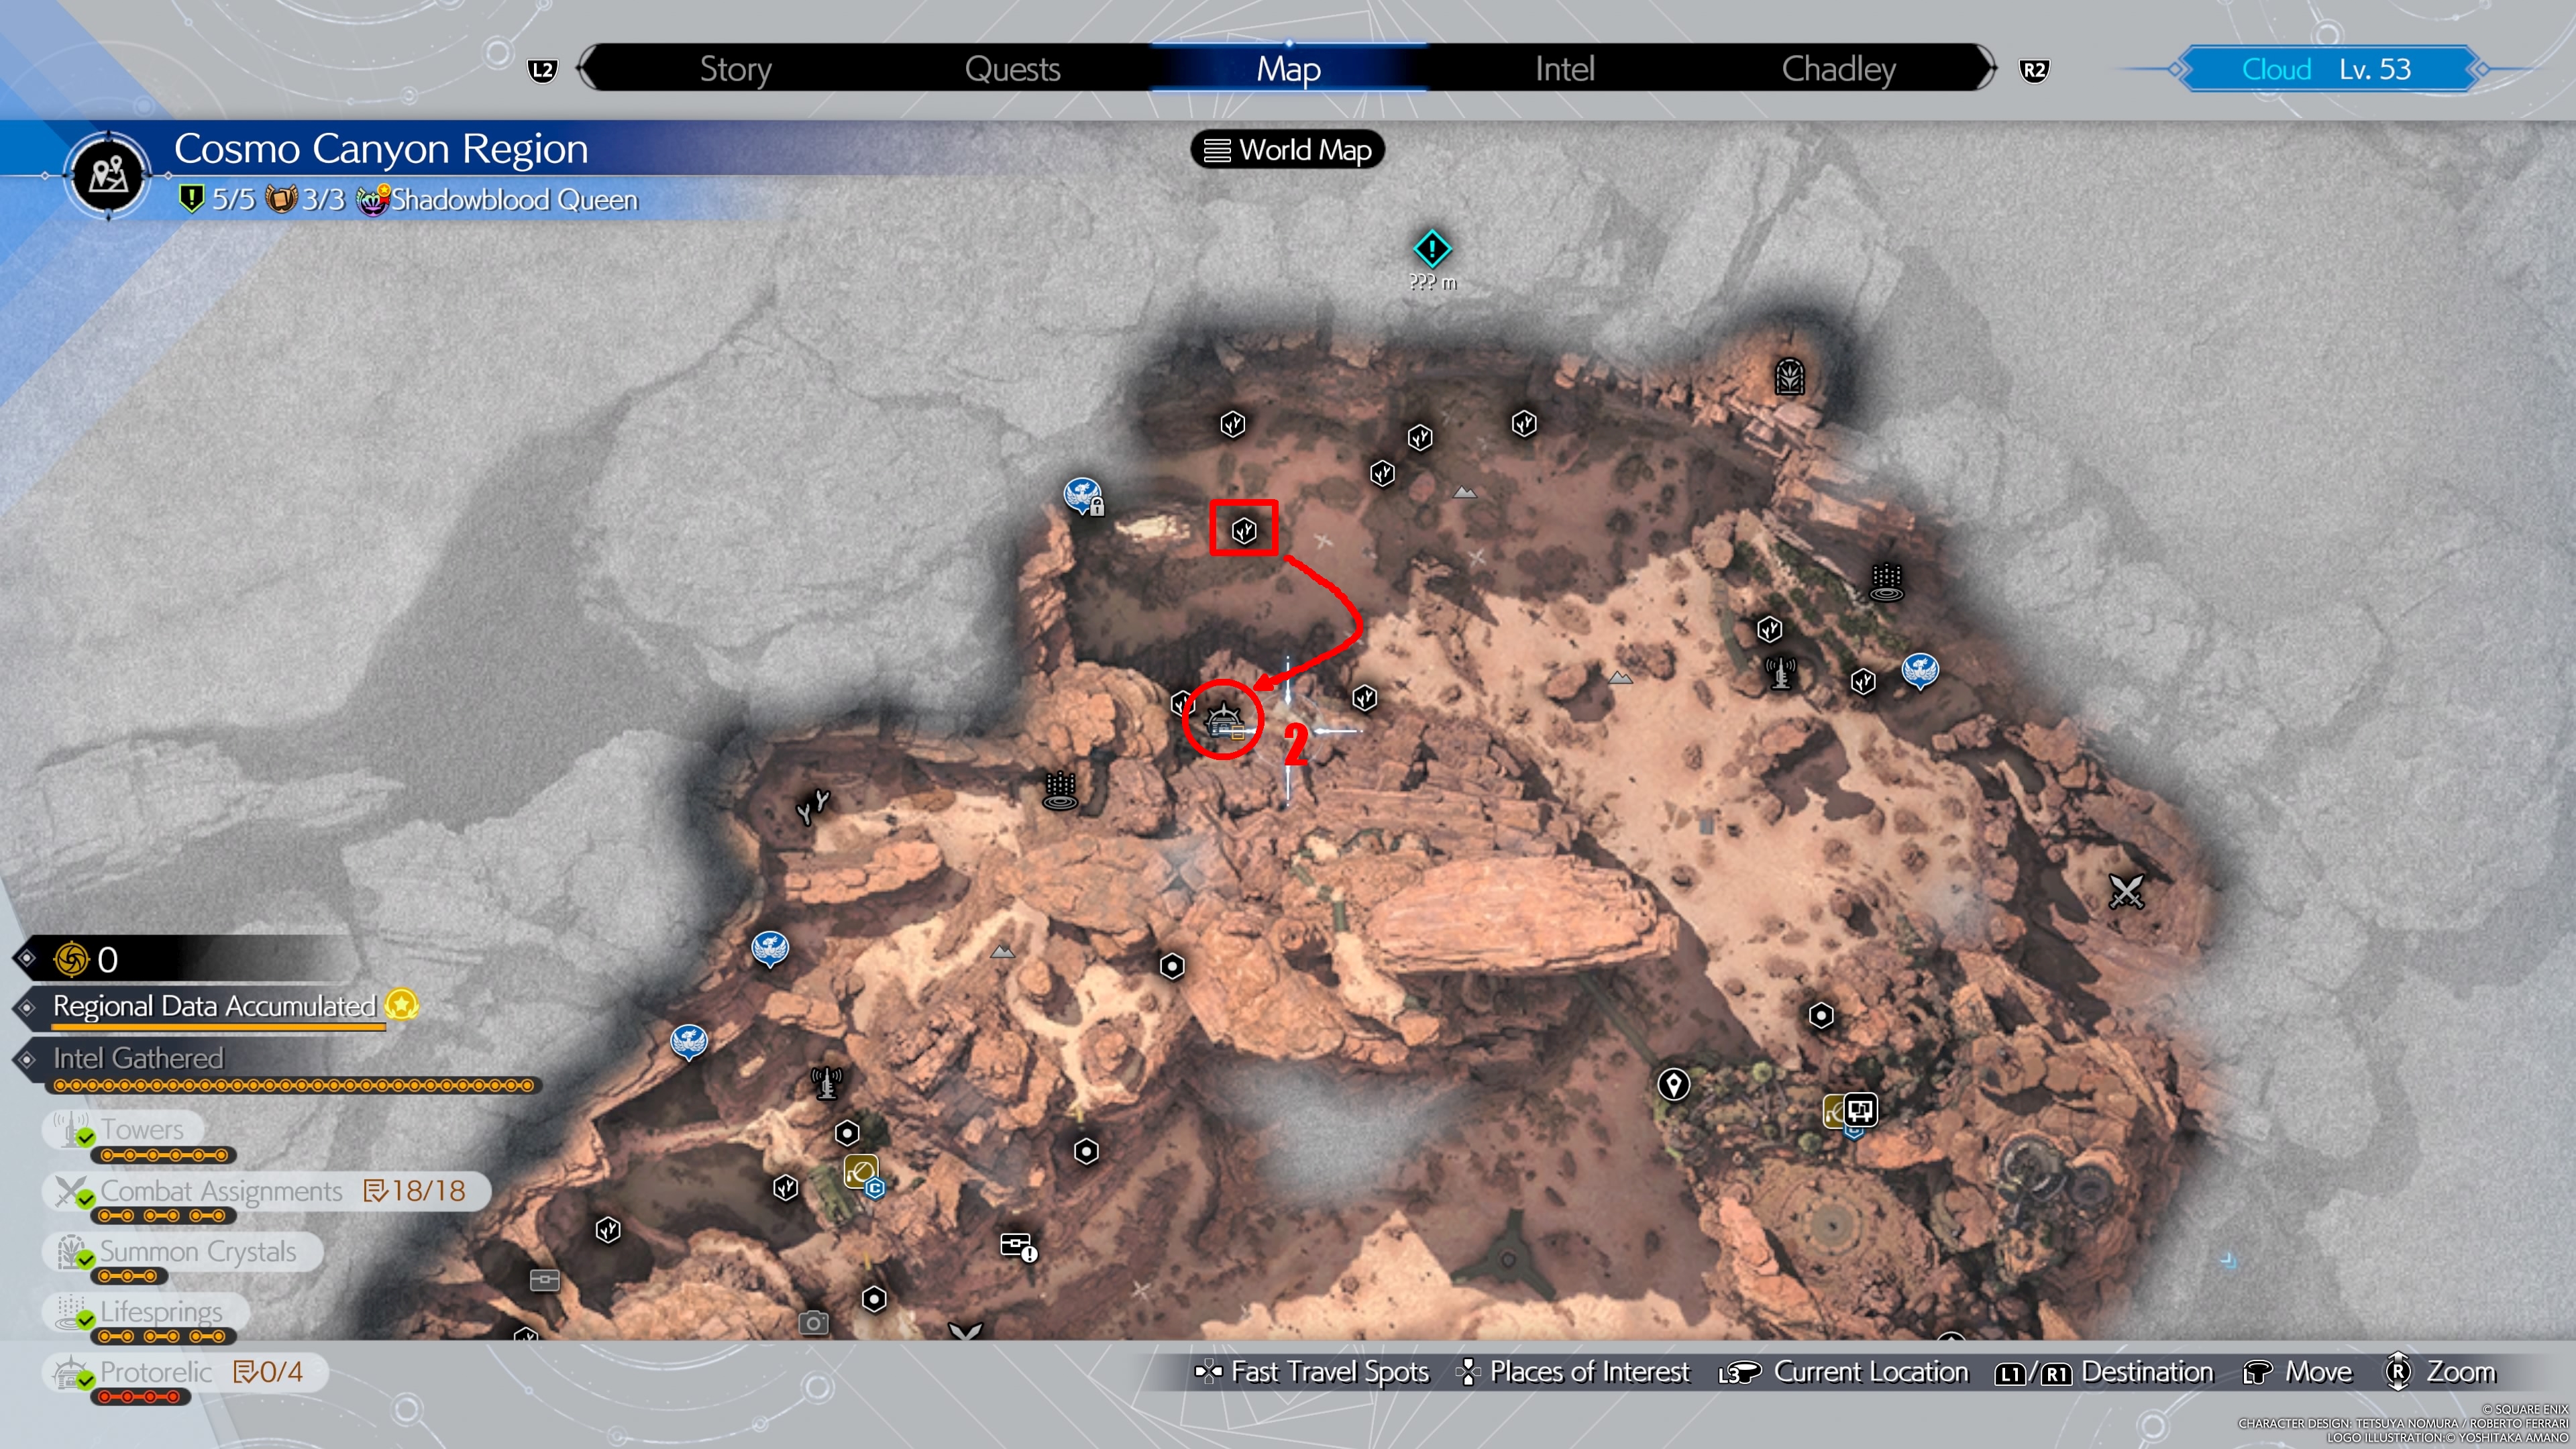
This node is located in the northen section of the Cosmo Canyon map. You'll also need to use your Chocobo's gliding skills to reach the node. Start by launching from the pad at Gliding Range No. 29, and flying southeast towards one of the air turbines. Catch some air from the turbine and veer right to land on the outcropping where the portal is located.
You'll then meet up with the crew, have a conversation, and settle in for the second round of Gears and Gambits.
As before, our strategy above or even the preset Robots will work fine for clearing the stage.
Phenomenon Intel 3: Memories of the Fallen
The third Protorelic node is located on the opposite side of the mesa from the first node. Make yourway to the Remnawave tower near the city ruins, and climb up (or glide down from the gliding range on the opposite side of the canyon) through the Excavation node to the Protorelic portal.
The third round of Gears and Gambits is slightly more intense than the second, but is once again doable using our setup or the preset Robot trio.
Phenomenon Intel 4: The River of Lights
The final Cosmo Canyon Protorelic node is accessible from the elevated ruins on the side of the canyon facing the first node. Cross or glide to the indicated point on the map and look for the Ruins Elevator nearby. Climb through the ruins to meet up with the Avalanche kids one last time.
The last Gears and Gambits node can be tougher. We were able to clear it both using our preferred spam strategy above, as well as with the preset abilities, but we had an easier time reconfiguring the robots to add a stronger, higher-cost option to help anchor the team. This is because the final version of the King Flan will change its affinity more often and use heavy AOE attacks that can wipe out the weaker bots, wasting time.
- T1 Robot
- Elemental Weakness Priority: Fire Shot x4
- Ally: Bravery Multishot
- Foe: Lariat
- Self: Modify HP & Cost - HP+300, Cost+15
- Self: Modify HP & Cost - Cost-20
- T2 Robot
- Elemental Weakness Priority: Blizzard Shot x4
- Ally: HP < 50% - Cure Multishot
- Self: Haste Field
- Foe: Lariat
- Self: Modify HP & Cost - HP +150
- T3 Robot
- Elemental Weakness Priority: Thunder Shot x4
- Airborne Foe Priority: Gravity Shot
- Foe: Lariat
- Self: Nullemental Field
- Self: Modify HP & Cost - Cost-40, HP-200
- Portal Skills: Regenga + Comet
This setup allows the bots to buff each other, while using the cheaper T3 robot as a spam unit that's slightly tougher thanks the the Nullemental Field, but able to deal with airborne enemies quickly. The more resilient T1 and T2 robots will be able to keep fighting through the enemy units and hit the King Flan while resisting a couple of the King's AOE attacks. Regenga keeps the robots in the fight longer, while Comet gives you a burst of damage that will wipe a pesky wave of enemies and hurt the King.
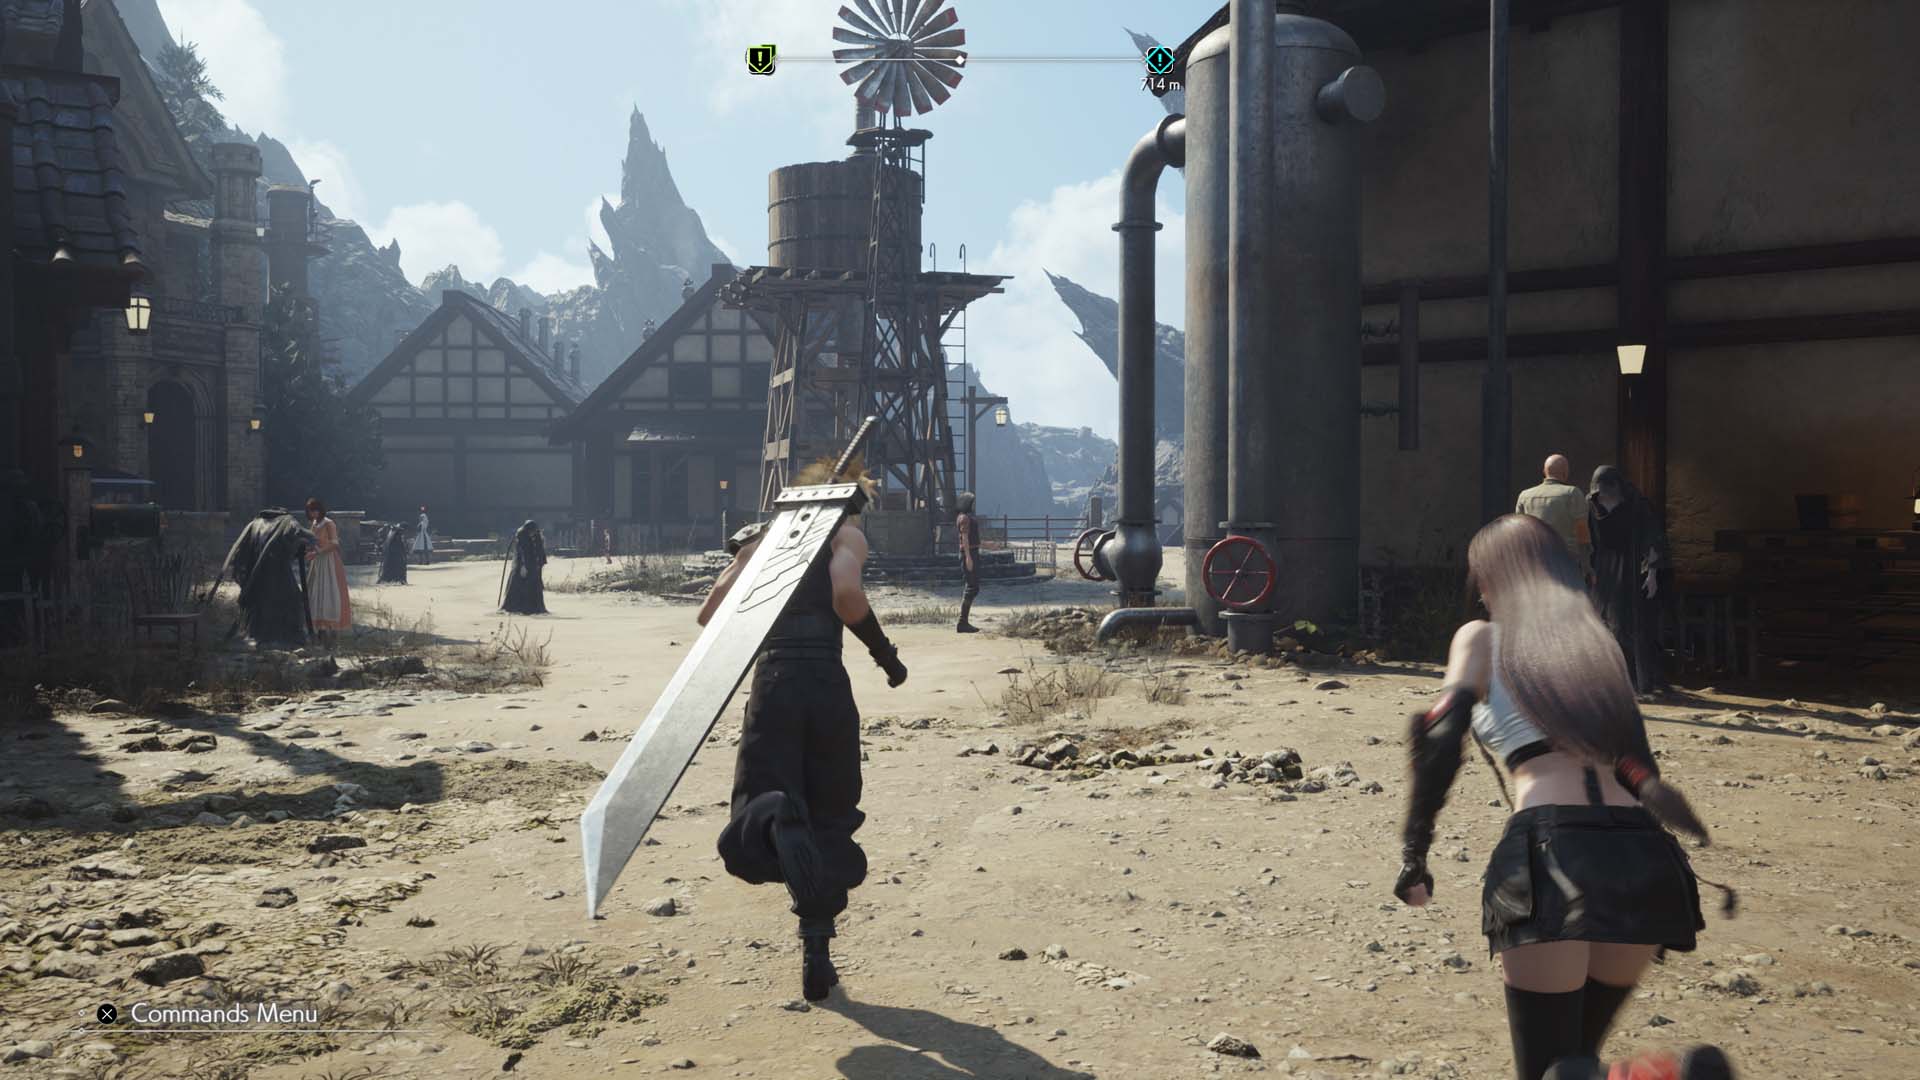
Nibel Protorelic Phenomenon Intel
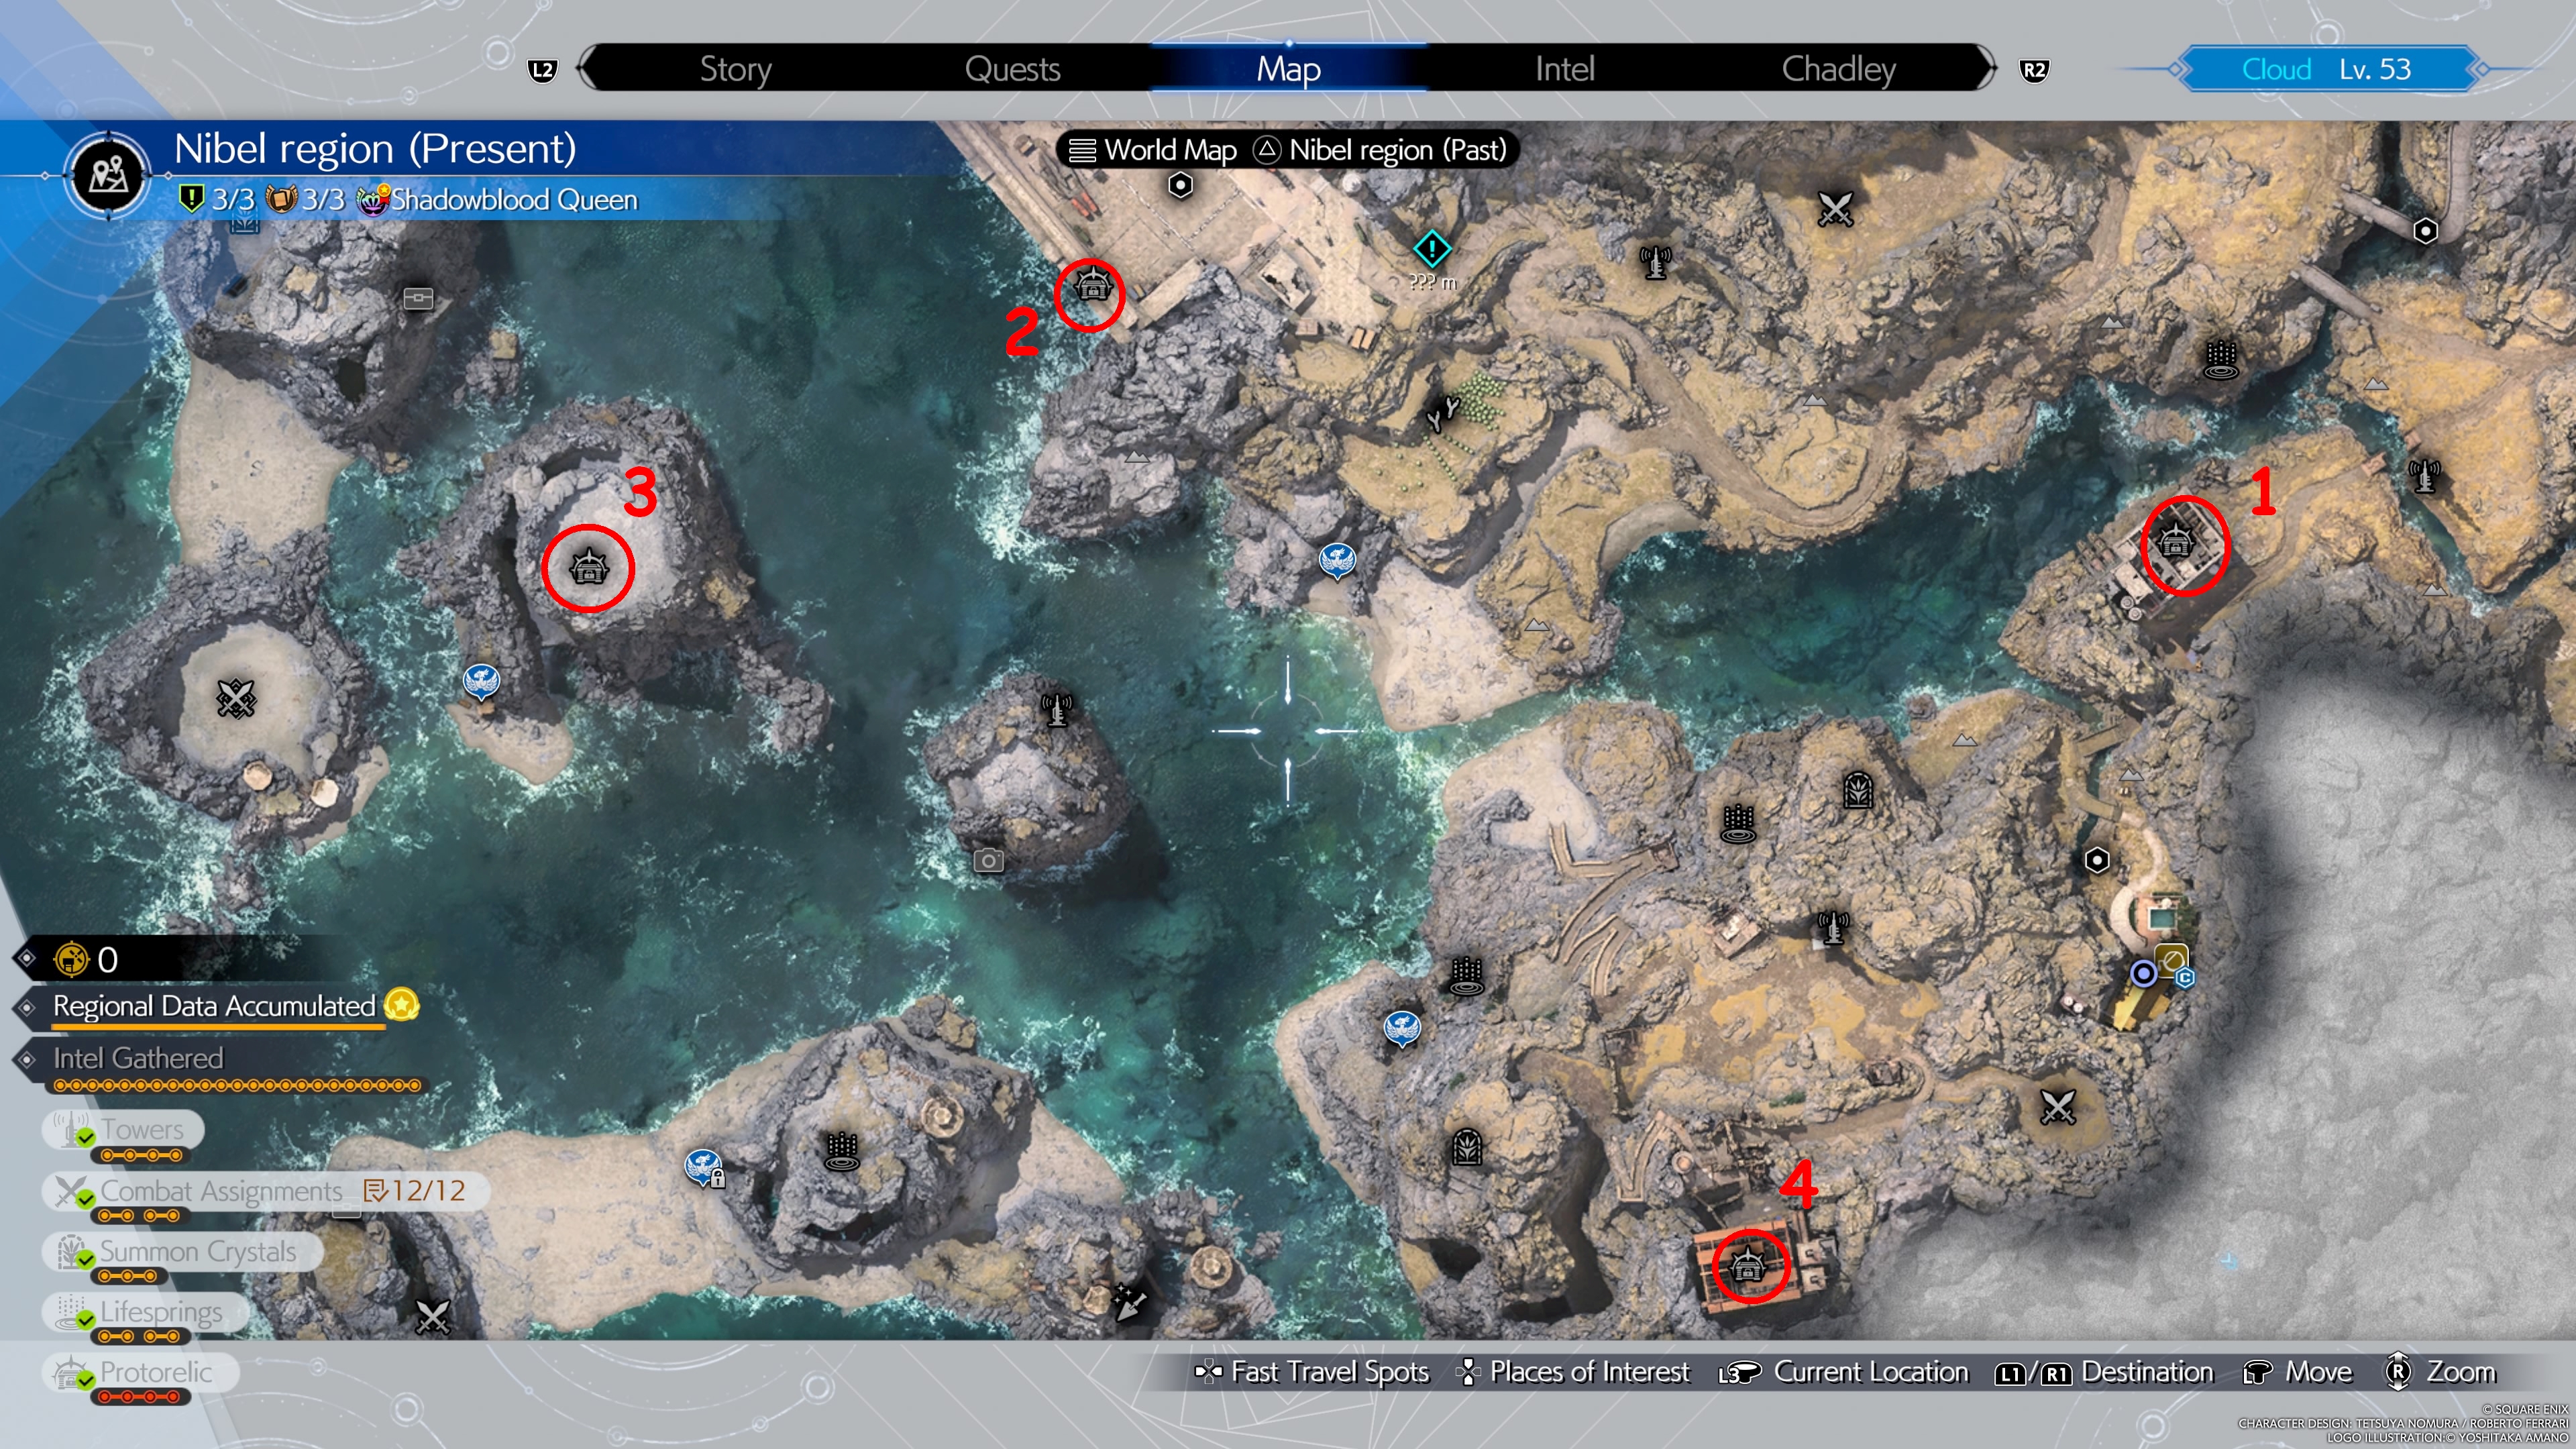
While Nibel has a side quest about herding cats, the region's Protorelic quests involve herding of people: Specifically, packs of Black Robes moving very slowly over to a mystery destination. At the start point of each quest, you'll find a group of Black Robes. You can then follow them, safeguarding them from fiends and pushing them lightly to help them speed up.
When the Black Robes arrive at their destination, you'll usually need to solve a small environmental puzzle or defeat some fiends to get them where they're going.
Phenomenon Intel 1: Testing the Waters
The Black Robes here will amble over the countryside, mostly testing your patience rather than your combat skills. They'll arrive at a locked door to a Shinra facility. Open the door, then enter and fight some Cavestalkers to clear the quest.
Phenomenon Intel 2: Disquiet on the Docks
The next quest will start in much the same way as the previous one, but the locked door will require some exploration to unlock. Mount your Mountain Chocobo and hover or swim out onto the water around the the docks situated under the Nibel airstrip.
Upon landing, you'll fight enemies, and continue using the Chocobo and its hovering ability to locate the ways forward. After proceeding around, you'll regroup with the Black Robes, fight some more fiends, and end the quest.
Phenomenon Intel 3: Cursed Confidant
The third Protorelic quest starts with a group of Black Robes being menaged by fiends. Defeat them. Escort the Robes up the winding path, and you'll find a gate locked by a valve mechanism. Use it several times to open the gate.
A second valve mechanism blocks the inner gate. This mechanism uses three valves, which you'll need to align properly to proceed. Use the valves in this order: Left, Right, Middle, Left, to unlock the gate.
You'll need to align one last valve before setting off a fight against the Sanguine Scourge mini-boss to complete the quest.
Phenomenon Intel 4: Wayward Soul
The last Nibel Protorelic quest starts once more on the shore, but you'll have to hover over water to find the Robes you need to escort.
Cross the water to the west, then hover up to the top of the island, where you'll trigger a boss fight against Gilgamesh. Drive him off to end the quest and unlock the final set of Protorelic Intel quests.
Meridian Ocean Protorelic Phenomenon Intel
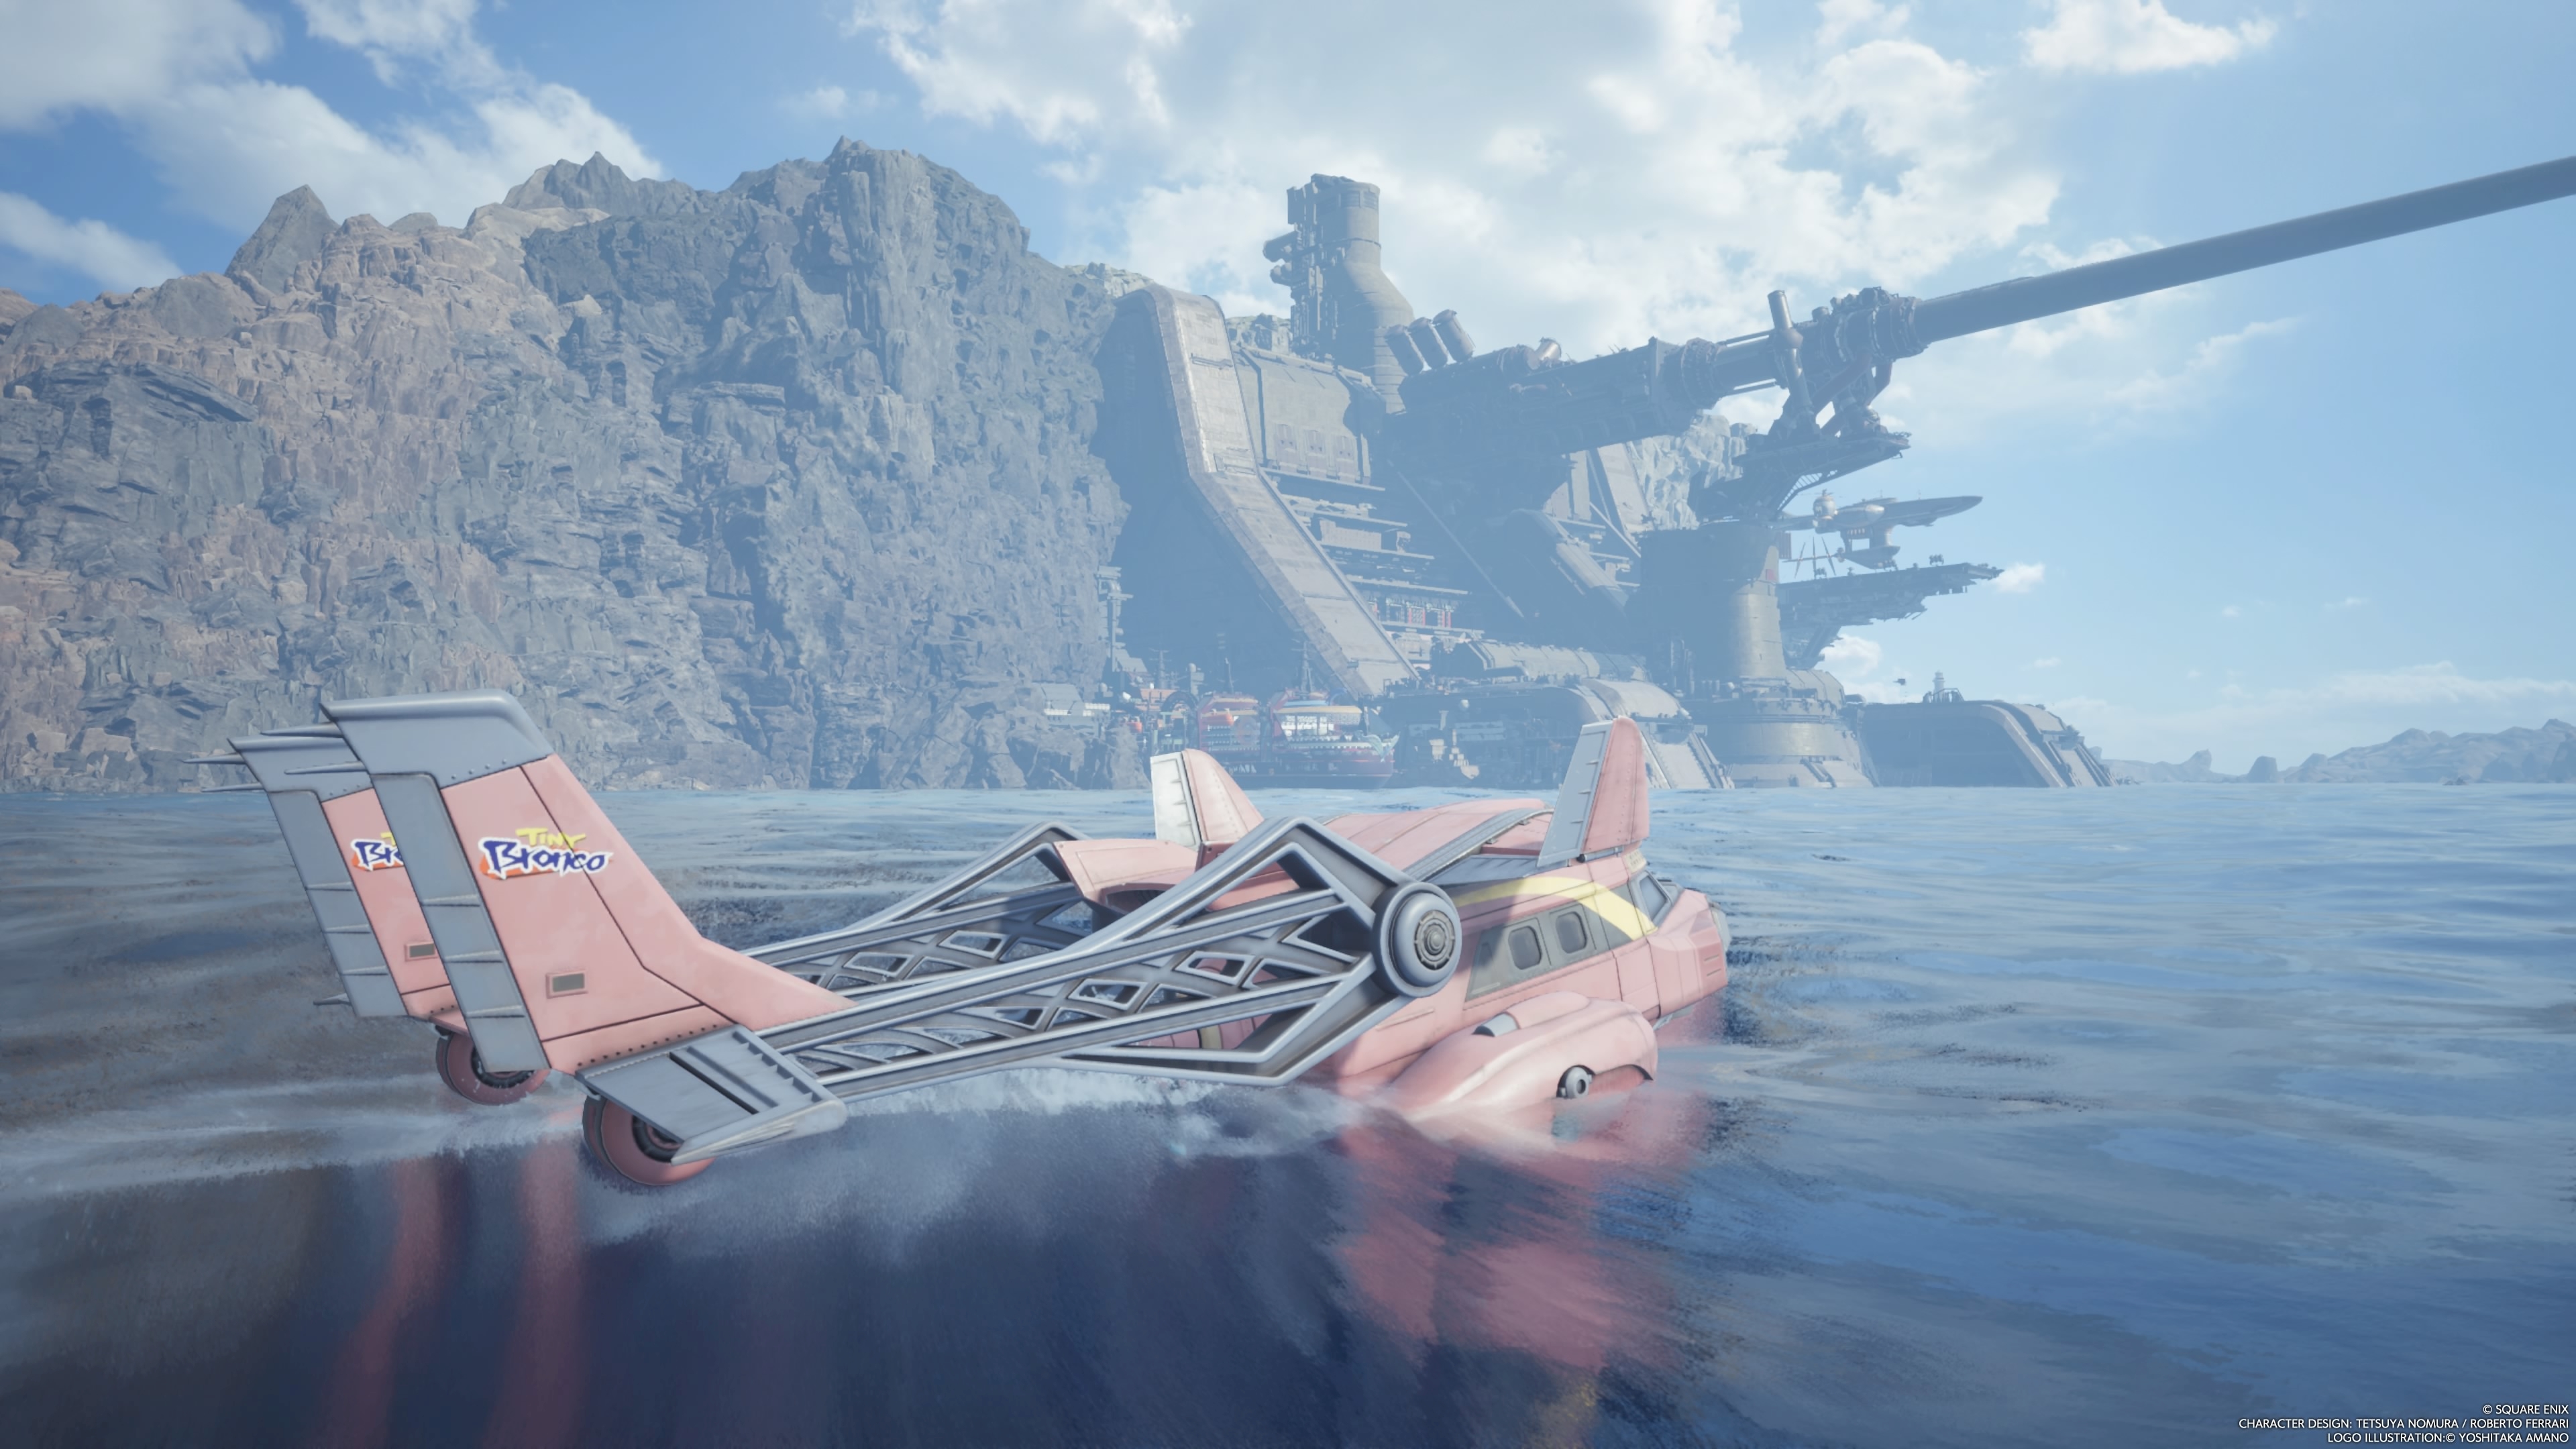
The last set of Protorelic quests in Final Fantasy VII Rebirth are located in the Meridian Ocean, the large body of water separating the game's playable continents. The nodes are located on a secret island, only accessible by using the Tiny Bronco to sail there.
In order to unlock these nodes, you'll also need to have completed all other Phenomenon Intel nodes, as well as all the Divine Intel nodes on each map, and earned all the Divine Intel Summons in the Combat Simulator: Titan, Phoenix, Kujata, Bahamut Arisen, Alexander, and Odin. Each of the nodes pits you against two Summons at the same time, meaning you'll need to combine strategies you honed in the combat simulator to succeed.
Once you've met the requirements, board the Tiny Bronco and sail to Gilgamesh Gardens.
Phenomenon Intel 1: Fare Thee Well, Gilgamesh
This node is actually tackled last in the chain, as it only unlocks after beating all three other nodes.
Defeating Gilgamesh can be a bit of a trial, but if you've practiced against Odin, you'll have an easier time. Perfect Blocks and counters will pressure Gilgamesh, causing him to drop weapons and reducing his attack power. Equipping the Precision Defense Focus materia makes it easier to block his attacks.
Gil can also summon a shield that absorbs damage and casts buffs. You can use Dispel to remove the buffs, but the shield will need to be damaged to take down and pressure him further.
Gil is also weak to Fire damage and Poison damage, so Fire and Bio spells will do a number on him. Finally, debuffing spells like Deprotect, Debrave, Defaith, and Deshell will also nerf his abilities and help you get the upper hand.
Lastly, you can counter his ultimate attack by using powerful techniques as he charges the move. Use limit breaks, Synergy Abilities, and your best Weapon Abilities to interrupt him.
Phenomenon Intel 2: The Bladesman of Legend
This node pits you against Titan and Bahamut Arisen at the same time. Both bosses will be shielded by a "Pulse" barrier that you need to take down in order to pressure them.
Titan is the weaker of the two bosses and can be taken down with Wind-element burst damage. Yuffie and Aerith both have specialities in dealing this out, so they're strong options for your party choices. Meanwhile, Cloud can counter Bahamut's ranged attacks with the Counterfire Synergy Skill, in addition to being one of the strongest DPS characters available.
While focusing down Titan, you'll still need to pay attention to Bahamut's wings, breaking them to prevent the summon from using Gigaflare.

Phenomenon Intel 3: The Genji Armaments
You'll have to fight the duo of Phoenix and Kujata in this node. Because Kujata can change its elemental affinity, you'll want Fire, Wind, and Ice elemental magic available. Consider bringing a caster like Aerith or Cait Sith, or a character that can quickly change elements like Yuffie.
As in the combat simulator, Phoenix will be almost impervious to all attacks for much of the fight's opening stages. You'll have to keep an eye on it while fighting Kujata, then hit it with a burst of damage when it tries to cast Empowering Flame.
When dealing with Kujata, use the opposite element to its current form. For example, cast Ice when it's using its Fire form, Fire when it's using Ice, and Wind when it's using Lightning.
Phenomenon Intel 4: Isle Out of Space-time
This fight pits you against one of the more difficult summons to fight: Odin, who is this time backed up by Alexander.
You'll need to focus much of your attention on Odin, considering his ability to immediately end the battle with Zantetsuken if he gets bored of your inability to block or counter his strikes. Use characters like Cloud or Yuffie with their ready-access counter moves to deal with Odin, and equip Materia like Precision Defense Focus and Steadfast Block to help with that task.
You'll be able to pressure Odin handily, and he'll disappear temporarily. Use the reprieve to focus on Alexander by destroying the boss' arms. Odin may appear again while you're still beating on Alexander, forcing you to shift focus again, but ideally you should be able to down Alexander before or shortly after Odin returns.
Once all the Phenomenon Intel nodes are clear, you'll be able to claim your well-earned rewards. Congratulations!